Monday, July 31, 2006

Summer Bolero Shrug

summer bolero shrug - front view summer bolero shrug - back view

This crocheted summer bolero shrug is what I was designing last week. I had to be a bit secretive as my family reads this blog and the shrug was a birthday present for my stepsister, Sharon.

summer bolero shrug - edging

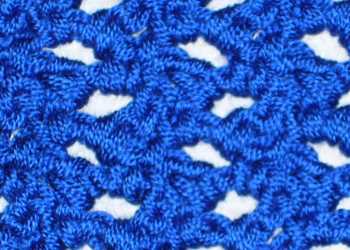
I used Lion Brand Microspun, a DK weight yarn, in royal blue and a size I crochet hook. The pattern stitch is (sc, ch 3, dc) worked in the same space. The edging round the neck, front and lower edges is 2 rows of single crochet separated by 1 chain stitch. The second row of edging works the single crochet in the chain 1 space of the first row.

The Design Process

The design process started with shopping for yarn on Monday. I bought as many skeins in the same dye lot as they had and hoped it was enough. They only had 4 skeins in the same dye lot, so I was crossing my fingers. Until I had most of the shrug crocheted, I wasn't sure 4 skeins would be enough.

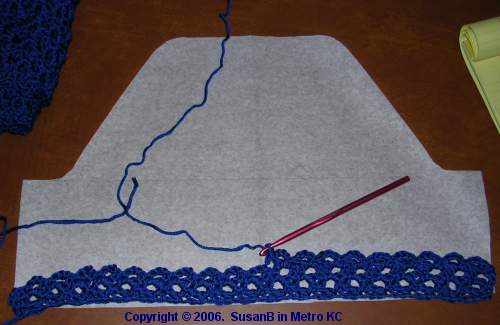
Next it was time to sit down and make some test swatches. This was needed to choose a pattern stitch and to determine my gauge so I knew how many to chain to start the shrug. I made a small sketch of the shrug with dimensions noted. Then I created a full size pattern with tissue paper.

Working the straight sections was easy. I just needed to lay the crochet flat periodically to check the length, so I knew when to start shaping. Shaping the underarm area, upper front and the top of the sleeves was interesting. The challenge was to maintain the pattern stitch while gradually decreasing the width.

working on bolero shrug body

The entire time I worked on the front sections, I sat at a table and laid the body of the shrug on the pattern every row or two to check the shaping. My yellow legal pad was close by to record every stitch I made. I have 8 pages of notes on how I crocheted this shrug, plus my sketches.

working on bolero shrug sleeve

I finished the back on Friday morning and started the first sleeve before driving to my mom's for the weekend. The shaping on the sleeves was a different angle than the shaping of the fronts. A 3 row repeat for the decrease versus an 8 row repeat. The sleeves are smaller, so I was able to sit in a comfortable chair with the sleeve pattern laying on an ottoman. I just had to keep the fans from blowing the pattern away.

Saturday morning, I finished the second sleeve and started weaving in yarn ends and sewing seams. And weaving in more yarn ends. I was sewing the 2nd sleeve into the armhole when the family started arriving for the birthday celebration. I quickly pulled out my needle and stuffed the shrug into a gift bag. I presented the gift, then took it back to finish it. (Quilters do this all the time, so I sure it's OK for crocheted gifts also.)

I finished sewing the 2nd sleeve in and wove in more yarn ends. I don't know where all those yarn ends came from. There were only 4 skeins of yarn! Then I did the edging. The neck/front/bottom edge needed the support, but I decided to leave a softer edge on the sleeves, so there is no edging on the sleeves.

At some point, I will transcribe my 8 pages of notes and put the pattern on my website. I don't know just when as there are several things I've been meaning to write up and put on my website and I haven't got any of them done.

Thursday, July 27, 2006

Some Designing Going On

crochet fabric

I'm working on a new crochet design this week. I'm using Lion Brand Microspun yarn in royal blue. The yarn is so soft and I've wanted to try it out for some time. The yarn has 6 strands which are only slightly twisted. Periodically I have to frog a couple of stitches because I've missed part of the strands. Not a beginner yarn, but I like the result.

I went to the library Monday morning and checked out The Ultimate Sourcebook of Knitting and Crochet Stitches from Reader's Digest. The book has 900 stitch patterns with color photographs and clearly gives the multiples for each pattern. It's arranged to make it easy to find medium versus heavyweight patterns or lace. I wound up picking a very simple stitch pattern that is probably in a book I have, (sc, ch3, dc) worked in the same space.

You'll have to wait for details on what I'm designing until next week.

Feels Like Christmas

Essential thread

Look what the mail carrier brought me this week! Twenty-five spools of "Essential" thread from the Connecting Threads catalog. I almost ordered some last February when it first came out, but I spent too long making up my mind and they sold out. It's back!

"Essential" thread is 100% extra long staple Egyptian cotton, size 50/3. There are 1,200 yards per spool. The spools are slightly longer and bigger around than a large spool of Swiss Metrosene or Gutterman thread. The cost is $1.99 per spool or $1.59 per spool if you buy a set. I bought 3 sets: neutrals, brights and pastel. I like to keep a variety of colors of thread handy as I never know what color I'll need next on charity projects. Hopefully, I'll have time to use some of it next week.

Tuesday, July 25, 2006

Pockets

quilts with pockets

This morning I sewed pockets on 3 of the Project Linus quilts I recently finished. The pockets are to hold one of the 4,000 Beanie Babies donated to the KC Project Linus chapter early this year. I pieced the pockets from scraps of fabric used in the quilt. The pockets on the baseball quilts sort of blend into the border.

Monday, July 24, 2006

Big Star Quilt

Big Star Quilt

Yesterday, I finished quilting this "Big Star" quilt top that I made in February. If you want to make a quick top, this is a good one. It finishes to about 42 inches square, but could be enlarged with a wider border. It's a simple design, if you have space to lay out your triangles and can keep them in the correct orientation when you sew them.

I wrote this pattern for the KC Project Linus chapter's National Make a Blanket Day last February. The pattern has been hiding on my website. I keep meaning to go back and revise it for 40" wide fabric. I learned that fabric widths are shrinking after I had it written. I also need to add a warning about directional prints. You can use them, but you need to be careful about which way you cut the diagonals if you want everything to be right side up.

I have a pretty standard quilting plan for this quilt design. I ditch quilt the vertical, horizontal and diagonal lines, plus around the outside of the star and the border. Then I quilt skinny diamonds in each star point from tip to tip. All 8 diamonds can be quilted without stopping and cutting the thread. I divide the background squares and triangles with more lines, creating more diamonds and triangles; two trips around the quilt without stopping. You can see most of my quilting lines in the photo. Click on the photo for a larger version.

Our blanketeers had a great time making this star and several variations. Rearranging the same squares and triangles gave a variety of results. Check out the KC chapter photo gallery for pictures of the some of the quilt tops that were made.

Sunday, July 23, 2006

Spotlight: Project Linus

I plan to periodically feature charities that seek handmade items and community service groups that make things for charity. I'm starting with my favorite, Project Linus. I've been involved with the Kansas City chapter since 1997 and I do the KC chapter website.

Project Linus is a 100% volunteer non-profit organization. It's mission is:

First, it is our mission to provide love, a sense of security, warmth and comfort to children who are seriously ill, traumatized, or otherwise in need through the gifts of new, handmade blankets and afghans, lovingly created by volunteer "blanketeers."

Second, it is our mission to provide a rewarding and fun service opportunity for interested individuals and groups in local communities, for the benefit of children.

Project Linus national headquarters is in Bloomington, Illinois. There are chapters in all 50 states and affiliates in Canada and the United Kingdom. Over 1.6 million blankets have been donated since founder Karen Loucks read an article in Parade magazine on Christmas Eve, 1995. Project Linus is named after the character in the Peanuts comic strip.

All Project Linus blankets are handmade, meaning not commercially manufactured. A blanket can be a knitted or crocheted afghan, a quilt, a fabric blanket or a fleece blanket with hand cut and knotted fringe. Sewing or knitting machines may be used to create the blanket. All blankets must be new and washable. Size may vary from preemie size to bed size, with 40" by 60" the most common size. Please check with your local chapter for specific needs and requirements.

For other organizations that need your handcrafting skills, visit Handmade for Charity.

Friday, July 21, 2006

Cooler Weather and a Quilt Siting

The thunderstorms rolled in this morning, bringing a much needed break in the heat. I made it to my sewing machine for the first time in 3 days and did some quilting on a star quilt for Project Linus. I have managed to continue knitting a bit each day on the brown and white feather and fan afghan.

I'd like to thank Nancy at NancyQuilts for adding me to her list of blogs that she reads. As far as I know, she is the first to link to my blog. Thank you, Nancy!

Today I saw a lovely Lone Star quilt on an episode of "The Equalizer" that originally aired in 1986. It was a scrap quilt and looked old. It was hanging on the wall behind the man who was about to be murdered. Fortunately, he fell forward when he was shot so the quilt was not damaged. I watch "The Equalizer" on the Sleuth Channel which appeared in the DirectTV line up about a month ago. Their slogan is "mystery, crime, all the time." Sleuth Channel can be found on satellite TV and some digital cable outlets.

Wednesday, July 19, 2006

Review: Knit & Crochet Ponchos, Wraps, Capes & Shrugs!

Want to make a poncho or wrap with a bit a flair? Knit & Crochet Ponchos, Wraps, Capes & Shrugs! may have a project for you. Edited by Edie Eckman, this book has knit and crochet designs for ponchos, capelets, and scarves. As a bonus there are patterns for leggings and gauntlets to match one of the knit ponchos.

There are no introductory knitting or crochet instructions. The individual patterns contain instructions for any special stitches with closeup photos of the finished stitch. The glossary has some minimal stitch instructions. The introductory chapter covers yarn basics, checking your gauge, and blocking the finished garment.

The patterns are not assigned a difficulty rating. Some should be doable by anyone with basic knitting or crochet skills and others are more challenging. The pattern instructions are presented in a table format. The multi-size patterns have a column with the instructions plus a column for each size that contains the stitch counts. Finished measurements are given for all patterns.

The yarns used in the book are not brands that you will find at the chain stores, but it should be straightforward to identify appropriate substitute yarns for most of the patterns. Each pattern first describes the yarn in generic terms. For example, bulky-weight mohair-blend yarn or worsted-weight wool or wool blend. Then the specific brand name and color(s) used is given along with the weight and length per ball and the number of balls of yarn.

The "Electric Cowgirl" scarf is an eyecatcher knitted in Trendsetter Binario "ladder yarn". It has a self-fringe formed by unraveling stitches. I love the richness of the "Starlet Shrug", crocheted in worsted weight wool with a fuzzy collar. Crossed double crochet stitches create a thick, lush texture and the sample is made in red, my favorite color. Check this book out and see what you like.

Tuesday, July 18, 2006

A Clean Sewing Machine . . .

before and after cleaning bobbin area of sewing machine

. . . is a happy sewing machine.

With all the sewing I've done lately, especially the fleece, I decided that I should clean the lint from the bobbin area of my machine. I don't do this as frequently as I should. Here is a before and after picture. A lot of the lint was under the bobbin case and not visible in the before picture (on top). The blue arrows point to a couple of areas that are visible. The after picture shows the lint I cleaned out on the left.

Clean your machine regularly and you won't have to pay for service so frequently. My favorite cleaning tool is a pipe cleaner. A pipe cleaner is flexible, fuzzy and fits into all sorts of places to pull out the lint. I learned to use a pipe cleaner from my Grandma B. I've used the same pipe cleaner for ages. I just pull the lint off of it.

Baseball Panel Quilts

baseball themed quilt

Hooray! I finished the last baseball panel quilt today and it's still baseball season. The baseball pillow panel fabric in the center of the quilt was a $1 a yard Hobby Lobby clearance find about a year ago. I think I bought 6 yards or 12 quilts worth. I had the all-over baseball print in the outer border from an earlier find and found some red in the stash for the inner border.

I backed most of these baseball panel quilt tops with twill fabric and did not use batting. Using the pillowcase method for finishing, no binding is needed either. Since there is no batting, minimal quilting is needed to hold the layers together. It's a quick blanket to make, but a dozen are boring. I did have some help, mostly from our 3rd Sunday Project Linus group that meets at JoAnns in Independence, MO.

Monday, July 17, 2006

Heat Wave

blanket made of strips of fleece

Why did I have a fleece blanket on my lap in the middle of a heat wave? Am I that committed to Project Linus or do I just need to be committed?

Our incoming blanket donations to the KC Project Linus chapter are way down this summer. More than the normal summer slowdown. So I'm trying to finish at least one or two blankets a week. It's not a lot, but it is more than I did when I was working. I still have several tops that need to be quilted.

This blanket is made from fleece scraps left from backing quilt tops. I'm getting the bulky fleece out of the house and the blanket was quick to make. The strips are however wide I could get from the scraps. Like the blanket made from the fleece squares on Saturday (see Blanket Making Birthday Party), the fleece is sewn wrong sides together with 3/4 inch seams. The black fleece is less stretchy which helps to stablize the seams.

Early this afternoon I was clipping the seam allowances on this fleece blanket. The outside temperature was on its' way up to 100 degrees. Fleece makes a lightweight blanket, but it is warm! I turned the fan up a notch to move the air faster, which helped. Tomorrow I'm sticking to machine quilting and keeping my lap empty.

Sunday, July 16, 2006

Blanket CPR: Is There a Surgeon in the House?

Our Project Linus blanketeers have a variety of skills and a variety of skill levels. Sometimes we receive a blanket that needs a little tender loving care before going to a child. Recently the Kansas City chapter received a bag of blankets that needed CPR.

quick quiltAll of these blankets were made from the quick quilt pattern created by one of our KC volunteers. It is a simple top with only 7 pieces of fabric to sew together. This pattern was used for all of the blankets that needed CPR. The pattern is available on the patterns page on our KC chapter website. The finished size is about 31" by 43".

The twins who run our 3rd Sunday blanket making group brought 11 of these blankets to our meeting at JoAnns this afternoon. All 5 of us dove in to perform CPR. Some blankets needed more CPR than others. There were seams with holes in them and other problems. None of the blankets had any quilting to hold the layers together. The multi-step zig-zag was a popular quilting stitch this afternoon as it holds the layers together and reinforces weak seams.

We found that cutting lines had been marked on the fabric and the pieces cut with scissors with varying accuracy. We guessed that these blankets were a service project for a youth group that had little skilled adult supervision. Christy, who works as an EMT, ripped one blanket completely apart and restitched everything. The machine used the first time had tension problems and the seams had lots of loops in the thread. One blanket was backed with red felt that was attached with long stitches. It was easy to remove.

Fortuitously, a nice fabric donation was delivered to us while we were doing our CPR work. Some of the backs on the CPR blankets were not large enough and the red felt was deemed inappropriate for a blanket. Some of the fabric donation was used to back 2 of the blankets. And the purple back that was too small for the blanket that Christy did open heart surgery on was the right size for a red/lime green/orange/pink blanket.

quick quilt

The results of our days work:

  • 9 blankets were revived and are ready to go to a child
  • 1 blanket is still in intensive care. Our EMT is going to rip it out while she sits in the ambulance between calls
  • we pulled the plug on 1 blanket and it will be an organ donor

Fixing blankets with problems is not fun. Especially when it is a stranger's work you're fixing. We did have fun describing what we were doing. The photo shows 3 of the blankets that we revived. We even had time to sew on a couple of brand new blankets.

Saturday, July 15, 2006

Blanket Making Birthday Party

Today is my 50th birthday. My mom and 2 stepsisters came up and we fixed quesadillas for lunch. Then we made blankets for Project Linus, with only a little coaxing by me.

My mom had warned me that she wouldn't sew on the machine but had said that she would do hand-sewing (something I mostly avoid on Project Linus blankets). I had layered a quilt with batting and backing, stitched around the outer edge and turned it right side out, ready for the opening to be sewn closed. Something for Mom to do.

Sharon claims no sewing skills at all, but said she'd be happy to trace pictures onto muslin for our Kids Helping Kids project. So I found the box of tracing supplies and got out the card table and she went to work. When Mom finished the little sewing project I gave her, she traced pictures also.

rag-style fleece blanket

Susie and I went upstairs to my sewing area and started by arranging some 8 inch squares of fleece. I cut the squares from fleece left over from backing some quilt tops. I sewed the squares with wrong sides together and 3/4 inch seams. When I finished the stitching, I took it downstairs and let Sharon start clipping the seam allowances to create the rag effect. The clipping is about half done right now. When finished, this will be a soft, cuddly blanket.

baseball themed quilt

While I sewed the fleece squares together, Susie sewed borders on a baseball-themed pillow panel to make a quilt top and started a second one, just like the first. When I finished sewing the fleece, I cut a piece of twill fabric to back the first baseball top and started finishing it with the pillowcase method. I got as far as topstitching around the outside edge before the family had to head home. Susie almost finished sewing the borders on the second baseball top. There's just 1 strip left to sew on. I plan to sew the last border strip on tomorrow and finish the quilting on the first baseball quilt.

All in all, a fun day. My mom even suggested that I bring the picture tracing supplies to her house the next time I visit. I think she enjoyed it. For more about my 50th birthday, read Nifty Fifty on my other blog.

Friday, July 14, 2006

Review: The Michaels Book of Needlecrafts

The Michaels Book of Needlecrafts has knitting, crochet and embroidery projects. Edited by Dawn Cusick and Megan Kirby and published by Lark Books, this 300+ page hardback book is almost equally divided between the 3 needlecrafts.

Each of the 3 book sections has a list of suggested tools, instructions for the stitches with nice large illustrations and other useful information. The skill level and finished measurements are given for each knit and crochet pattern. The knit and crochet patterns use yarns that are available at Michaels Arts and Craft stores and other chain stores. The knitting section has a page on substituting yarn and the crochet section has a table describing the common weights (by name, not number) with common hook sizes used for each type. It would have been helpful if they had included the yarn weight for those that want to use a different yarn.

The knitting projects include 2 afghans, tops, sweaters, socks, mittens, scarves, hats, purses, a dog sweater and collar, an Ipod holder and wire and bead jewelry. The crochet projects include tops, sweaters, hats, scarves, ponchos, shawls, baby clothes, baby afghans, and purses. The yarns used include cotton, chenille, fuzzy eyelash yarn, mohair, ribbon, microfiber and some more basic yarns.

Most of the embroidery designs are applied to purchased items such as clothing and purses. There are a couple of scrapbook and embroidered card projects. The embroidery techniques include beading, hardanger, and ribbon embroidery.

If you like to knit or crochet with some of the current yarns you will enjoy the projects in this book. If you are a fan of basic acrylic worsted weight yarn, you'll want to look elsewhere. If you like to embroider you may find a design you can't resist in this book.

Thursday, July 13, 2006

Ripple Afghan Finished

finished purple and gold afghan

Yesterday morning I finished the purple and (2-tone) gold afghan from a Ripple Dilemma. Depending on the light, the 2 shades of gold range from not obvious to very obvious. But it's done and some kid will love it. The finished size is about 34 by 45 inches. I used roughly a pound and half of yarn. The pattern is on my website.

Last night was my 2nd and 4th Monday of the month quilt group. We lost our meeting place and are temporarily meeting at a local quilt shop on Wednesdays. We're a small group. There were 5 of us last night, including the shop owner. For show and tell, I took the ripple afghan, the heart applique quilt, and the crayon quilt that was finished at craft night last Friday. Deborah brought a bed-sized flannel quilt that she had made. It looked very warm and cozy and was made from a variety of light to medium colored flannel prints.

We are a group of quilters, but we frequently bring non-quilting projects to work on while we talk. I knitted on the brown and white feather and fan afghan (see craft night for a picture). I got a few rows done at quilt group and a couple more after I got home last night and a couple more this morning. If I keep this up, I'll actually get the afghan finished!

Tuesday, July 11, 2006

Second Saturday Charity Quilting

For some reason I've had a block against productive computer use the last few days, so I'm just now posting about my second Saturday of the month charity quilting group that met 3 days ago. We meet from 10 to 5 the 2nd Saturday of every month. The group is called Quilts from Cornerstone and meets at Cornerstone Church in Lee's Summit, Missouri. Everyone is welcome and about half the group do not attend the church.

checkerboard quilt top

Our main project this month was this checkerboard-type baby quilt top. We alternated 4" strips of a flannel print with 4" strips of solid fleece (4 strips of each). Fairly simple, but the fleece is stretchy. I sort of stressed over trying to get the sewn together strips flat and straight to cross-cut them. I think the walking foot definately helped with the sewing. This top that I made is a 9 by 9 checkerboard and is about 31 inches square. Most of them were 8 by 9 squares. I frequently do things a little different.

watercolor quilt top

Our fearless leader, Jeanine, finished this watercolor type quilt. She worked on it during the Friday night craft night also. She started by sewing together 2 inch wide strips, not squares. It was sort of complicated and she had to pay attention to the instructions. I think she said there are 81 different fabrics. This is another one of her efforts to use up some of the accumlated scraps.

flying geese quilt top

After piecing the baby checkerboard top, I found this flying geese top in the tub of partly finished tops. The geese blocks were done and sewn together in pairs, so it was quick to finish stitching together. I worked on a second flying geese top that didn't have quite as much done. I got as far as having the 3 strips of geese blocks sewn together on the second one.

Saturday, July 08, 2006

Craft Night

My 2nd Saturday of the month charity quilting group had a craft night last night from 6 to midnight. Friends were invited. We brought whatever personal project we wanted to work on. Some brought their sewing machines and stitched quilt pieces. Some brought knitting, crochet or scrapbooking. We had a lot of girl talk and a lot of fun. Some of us chose not to stay until midnight.

brown and white feather and fan afghan

I accomplished 2 goals that I had for the evening. The first was to start working on this feather and fan afghan that my younger stepsister gave me several years ago. The last dozen or so rows had reversed the knit and purl sides. I ripped those rows out last night, got the stitches back on the needles and determined that my left-handed stepsister knits from left to right. I'm right-handed, so I'm purling when the pattern says knit and knitting when it says purl. I did 10 rows last night and the knit and purl sides are staying where they belong.

quilt with crayon blocks

The second goal I accomplished was to get someone to do some tying in the picture blocks on this crayon quilt. On Thursday and Friday I quilted in the ditch between the blocks and between the borders. I also free-motion quilted the outlines of the hearts. The blocks are 7½ inches, so the picture blocks needed something to hold the layers together,but I didn't want to quilt them and I don't like to tie. My friend Jodie volunteered. Thanks, Jodie!

Thursday, July 06, 2006

Neglected Embroidery Project

partly embroidered tea towel

I mentioned in My Favorite Crafts that I have an embroidery project that I started 6 months ago. This kitchen tea towel of a chef preparing food is that project. Sorry the picture isn't better. My camera didn't like the white towel.

My stepsister's mother-in-law (SSMIL) prepared a set of towels using iron-on embroidery transfers to apply the pictures. She enlisted family members to embroider the towels for my 22 year old neice. My stepsister got our side of the family involved. This started last November. I assumed it was a Christmas gift, but it wasn't. Relieved I put the towel away.

In January, I pulled it out to work on. First crisis. I have no idea what colors to use. I've never seen the original pattern. Talked to my mom. She knew of no color guidelines and it's just whatever we want. My evening quilt group helped me pick out some floss and I got started. It actually went pretty well for a while. My stitches look good even if I haven't done any embroidery other than counted cross-stitch for 2 decades.

The towel got put away for a while. I finally got it out to work on again. Crisis #2: Few of the remaining lines in the picture are easy to see. There's a window with curtains and flowers behind the chef's head and you can barely seen them in really, really good light. I stress out and put it away again. Did that a couple of times over the course of 6 or 8 weeks.

I took the towel with me to the family 4th of July gathering this week. SSMIL is there and I produce my towel, plead poor eyesight and faded embroidery design. SSMIL went back to her house, a few blocks away, and got the pattern. I now have the original embroidery transfer pattern to help figure out what the design is. Maybe with some good light and the pattern I'll be able to get motivated to finish the embroidery.

Wednesday, July 05, 2006

My Scrap Basket

basket of fabric scraps

I hate to throw things away. I put all my leftover fabric strips, trimmings from quilt backs, etc. in this basket. It is filled to overflowing. I've got to start making something from all these scraps. There are pieces that are 15 years old!

I've started to work on getting some of the scraps in shape to sew. The bags in front of the basket are the result of that effort.

  • 2 ziplock bags of 4½ inch squares to make "Crazy Cut-up 9 Patch" blocks.
  • One bag of 1½ inch squares for little 9 patches (left from a Burgoyne Surrounded quilt 10 years ago).
  • A bag of small pieces and a gallon bag with strips that I've trimmed the selvage and/or uneven edges off of. I'm planning to try out the "Mile a Minute" pattern by Carol Coski. It is in the Winter 2000 issue of American Quilter.

That is for starters. Then maybe I'll try the Chinese Coins pattern. If you have any ideas on semi-quick ways to use scraps, please leave a comment with your suggestion.

Review: Crochet from the Heart

Looking for some easy crochet projects to make for charity or gifts? Crochet from the Heart: Quick Project for Generous Giving by Kristin Spurkland may have just what you're looking for. The book contains 18 projects, including afghans, hats in sizes for infants through adults, scarves, booties, footies, finger puppets and more.

For those relatively new to crochet or who just need a reminder, there are 15 pages of basic how to crochet and finishing information. Many of the patterns list a specfic brand of yarn, but they all give the yarn weight in the new numbered system. E.g., "3" is light, DK or light worsted weight. This is very helpful in identifying appropriate yarn for a project.

All of the patterns give finished sizes for the project. I especially like this for the hats and other clothing items. I did notice that the hat dimensions vary depending on the stitch pattern. Stretchier hats finish smaller than less stretchy ones. I'm going to make some notes to help me the next time I start designing.

The instructions are clearly written. On the multi-sized clothing patterns it would be good to mark the specific instructions for the size you are making before you start crocheting to make the pattern easier to follow. This is a good book for new crocheters and those looking for an easy project.

Monday, July 03, 2006

The Lure of Knitting

I watched the "Art of Knitting" this afternoon. Half to 2/3 of it anyway. The DVD box says the running time is 3½ hours. I've been reading "The Knitting Answer Book". I borrowed both of them from the library. I'll post reviews after I finish them. I also crocheted on the purple and gold ripple afghan (see A Ripple Dilemma).

I haven't done any knitting in the last couple of months, but I have thought about it. I have a kit for a summer top that I found at a thrift shop 3 or 4 years ago. I got it out a couple of weeks ago and looked at it, thought about, and decided I should finish another project or two first. And I'm again thinking about designing a preemie baby afghan pattern in knitting.

I have made several knitted items in the last year. It started when I stumbled across a crochet shrug pattern and decided that a shrug would be a good gift for my best friend. But I couldn't find a crochet shrug pattern that I liked. I started to design my own, but couldn't find a stitch pattern that I liked the feel of for a shrug. I decided that it needed to be a knitted shrug and found a knit pattern that I liked (Leef Bloomenstiel's Elegant Shoulderette Shrug), bought yarn and started knitting.

My friend and I were browsing at a bookstore during my vacation visit last year and I saw a pattern for handwarmers (a.k.a., fingerless gloves). My friend is cold natured and I keep the heat low to control the winter heating bill, so I thought handwarmers would be great for both of us to wear indoors to help keep warm. The only patterns I could find used worsted or bulky weight yarn, which I felt was too heavy for indoor activities. So I created my own pattern using sport weight yarn. My friend got her handwarmers for Christmas and after Christmas I made a slightly larger pair for my aunt. I need to make a pair for myself before it gets cold again. I want to put the pattern on my website also.

I've got a half-finished feather & and fan afghan that was given to me with the knitting needles still in it. I forget how many years it's been in my closet. I had it out a couple of months ago and showed it to a quilting buddy who is an expert knitter. It has a couple of minor problems that I wanted her advice on. Maybe I'll work on it soon.

Yes, I think there is definately more knitting in my future. My relatively near future.

Yarn Find

I made a brief shopping trip today which included a stop at Hobby Lobby. I scored 8 variegated skeins of Red Heart Super Saver yarn for $1.30 each. The color name is Polo, which is a mix of red, blue, green, brown and tan. Six skeins are the old 6 oz. size and 2 are the current 5 oz. size. The 2 smaller skeins are a different dye lot, but they look like the same shade. This should be enough yarn for two Project Linus afghans. Somehow I seem to have more luck at finding clearance items at the Hobby Lobby near my mom than I do at the one near my house.

Sunday, July 02, 2006

Happy 4th of July

Everyone have a safe and happy Fourth of July. I'm heading to my mom's for a couple of days. I'll only have dial-up access, but I will try to post a couple of things while I'm gone.

Saturday, July 01, 2006

Heart Applique Quilt

heart applique quilt

I'm slowly working my way through the stack of quilt tops that I've made for Project Linus. Donations are really down this summer, so I'm trying to finish some blankets.

I finished this quilt with appliqued hearts today. A few years ago, a bunch of cutouts from preprinted panels were donated to the KC Project Linus chapter. Mostly stuff that was designed to be pillows or stuffed toys. I've had custody of a sweater box full of cutouts for quite some time. Early this year, I pulled these 4 hearts out and machine appliqued them to a tone-on-tone off-white fabric and added a border.

flower print fabric

The floral fabric on the right is the back of the quilt. One of my dollar a yard bargains from Hobby Lobby.

I quilted around the edge of all the hearts. I quilted the interior of the larger hearts with 4 more hearts following the design of the fabric. I quilted a heart inside the outer edge of the smaller hearts and then did free-motion quilting around the figures. I echoed the outline of the hearts and the border to fill the background. You can see those quilting lines in the picture. Lastly, I quilted a gently curving line in the red border to make the amount of quilting similar to the rest of the quilt.