Wednesday, September 27, 2006

Procrastination - My Best Skill?

bunny slipper parts

Seems like no matter how much lead time I have, I'm always working up to the deadline. The birthday party is less than 72 hours away and this is what the fluffy bunny slippers look like. I started yarn shopping 6 weeks ago and went through 3 different combos before choosing the Paton's Divine and Lucette. Not ideal, but the best choice in fluffy pink in the chain stores. I've been crocheting for 4 weeks. Obviously not the entire 4 weeks or these bunnies would be done by now! I need to sew these together and the crochet the sides and heel on the left one tonight. They need to be laundered to fluff them before I add the eyes and noses.

Monday, September 25, 2006

Review: The Crochet Answer Book

The Crochet Answer Book, by Edie Eckman, uses a question and answer format to present a lot of information in a compact size. Subtitled "Solutions to Every Problem You'll Ever Face; Answers to Every Question You'll Ever Ask", the book includes many of the crochet questions you are likely to have. A beginning or intermediate crocheter will find much helpful information.

The book is divided into 11 chapters including: hooks and other tools, a good yarn, strong foundations, in stitches, tense about gauge, going in circles, a whole cloth, pattern language, on the edge, the finish line and something different. A resources section in the back of the book gives suggestions on finding other crocheters and crocheting resources and has a few useful, informative websites.

"The Crochet Answer Book" is 4½ by 6½ by 1 inch thick, a nice size to carry with your crochet. If you have no crochet experience, you may want to get or borrow a book or video with basic how-to-crochet instructions. The stitch diagrams and instructions in "The Crochet Answer Book" are as good as those in most pattern books, so if you learn easily from books they may be all you need. Once you've made that first scarf or dishcloth, this book can answer your questions and help you learn the finer points of crochet.

This book has good information on marking stitches, finishing your work, how many increases you need to make a flat circle or square, and more. There is detailed information on reading patterns, covering both abbreviations and stitch diagrams.

There is such a variety of crochet stitches and stitch patterns, it is impossible to give detailed information on all aspects of crochet in a book this size. A few of the answers were disappointing. For example, in discussion Tunisian crochet (afghan stitch), the question: "Can I work stitch patterns in Tunisian crochet?" is asked. The answer: "Absolutely!" plus two high level sentences summarizing some of the things you can do. No specific instructions, illustrations or even a suggestion to get a book on Tunisian crochet. If you're going to present the question "Can I ABC?", the answer should say a bit more than "yes" and give some useful details on how to do ABC.

Friday, September 22, 2006

Yarn Out, Afghans In - Sept. 22. 2006

Dolores called a couple of days ago needing more yarn. Dolores is a Project Linus volunteer in her late 80s. She makes about 50 afghans a year for PL. I played yarn lady today and took her 2 big bags of yarn and one smaller bag, all stuffed with yarn from Coats & Clark and yarn bought courtesy of the Telecomm Pioneers. It's been a while since I've been able to take her this much yarn and I've got yarn left to do it again in a couple of months. I picked up 6 afghans that Dolores had finished.

Dolores was telling me about her 16 year old grandson, Hunter. She taught him to crochet, but he also learned to knit. He is knitting scarves for Christmas gifts and is knitting something pink and white for a teacher's baby. He's studying French and taking a trip to Paris in March, around his 17th birthday. Sounds like a pretty remarkable young man.

From Dolores' house, I went on to our Project Linus coordinator's house. I took Dolores' 6 afghans, the 4 blankets from my second Saturday group, and a lot of fabric bought with the Pioneers money. Patty should have fun mixing and matching fabric.

Thursday, September 21, 2006

Website Updates - First Knit Pattern - Sept. 21, 2006

seed stitch handwarmers with a twist

I just uploaded my very first knitting pattern to the website. Seed Stitch Handwarmers with a Twist are just the thing to keep your hands warm on the cool winter evenings ahead. I designed this pattern late last year for my best friend's Christmas gift which I made in TLC Wiggles yarn. You can use any sport weight yarn. If you have Lion Brand Sportweight Woolease in your stash, it makes really soft handwarmers. Unfortunately, the sportweight Woolease is no longer manufactured.

I've rearranged the index to my Craft Patterns to separate the non-crochet patterns from the crochet patterns. I've added a quilt and a knitting pattern this month and plan to add more quilt patterns and maybe another knitting pattern. I also moved the links to off-site crochet instructions to the bottom after the pattern links.

I have 2 crochet and 2 quilt designs I've been meaning to write up for some time and the more recent Summer Bolero Shrug. A couple of people have expressed interest in the half-double crochet swirl cap pattern since I started crocheting hats a few weeks ago. The pattern is fairly short, but the placement of the front post double crochets, that create the swirls, is a bit tricky. A good friend took pictures 2 years ago to illustrate and I'm still procrastinating.

Tuesday, September 19, 2006

Review: Creating Your Perfect Quilting Space

Creating Your Perfect Quilting Space: Sewing-Room Makeovers for Any Space And Any Budget by Lois L. Hallock contains practical advice for organizing your quilting space and eliminating clutter. Hallock focuses on ergonomics and efficiency. There are many good ideas in this book and I think it's going on my wish list.

Ergonomics are important to avoid pain and injury and have an enjoyable quilting experience. This book explains what furniture heights are appropriate for different tasks and gives low cost suggestions for improving the ergonomics of your workspace.

Hallock also emphasizes efficiency and feels an efficient work triangle of sewing, cutting and ironing stations is important. She suggests secondary cutting and pressing stations that can be reached while seated at the sewing machine. My quilt studio flunks the efficiency test, but I'm used to it.

The book presents a methodology for folding fabric and storing it on open shelves so that everything is visible. This makes a wonderful, uncluttered display. There are some good ideas on how to store fabric yardage, fat quarters and scraps, so they are neat and accessible. My long term storage is in a closet to prevent fading and I'm not keen on exposing my stash to daylight for an extended time.

The book is organized into 5 sections: the basics of quilt studio design, assessing your situation, finding the right solutions, turning your design into reality and real-life studio makeovers. The basics of quilt studio design include location, the work triangle, lighting and ergonomics. Assessing your situation covers determining your needs, including how much storage, and planning the layout. Finding the right solutions covers furniture and storage options and a design wall. Turning your design into a reality covers planning, budgeting and scheduling.

My favorite part of the book the examples of quilt studio makeovers. Seven makeovers are presented with before and after pictures, floor plans and budgets. Costs were $100 to $10,000. The $100 makeover rearranged the existing furniture and added a design wall and a cutting and pressing pad. The $10,000 makeover converted a 2-car garage into a 2-person quilt studio. The other makeovers cost 1 to 2,000 dollars. Lots of low cost and ready to assemble furniture was used.

If you quilt on a regular basis, this book is definately worth reading.

Monday, September 18, 2006

Crayon Quilt Finished - September 17

crayon picture quilt

I chose crayon pictures with a farm animal theme and paired them with heart blocks to make this quilt. I finished it yesterday before going to our 3rd Sunday Project Linus group. Saved the photos for today since the blog was well-fed yesterday with pictures from the PL group.

This crayon quilt is backed with fleece and has no batting. I quilted this about a week and half ago and finally went back to finish it yesterday. When I use a fleece back, I do the following:

  • layer the top and back with wrong sides together
  • do the quilting
  • trim the fleece an even distance from the edge of the top
  • turn the fleece to the front over the edge of the top and
  • top stitch the edge down.

On this quilt, I trimmed the fleece 1½" from the edge of the top and turned 1" to the front.

mitering a fleece corner

I stitch a miter in the corners. This picture shows the quilt folded to stitch the miter. (I've already trimmed the excess fleece off the corner.) Remember, I cut the fleece 1½" from the edge of the top and only turned 1" to the front, so my miter seam does not end at the corner of the quilt top. I positioned the ½" line on my ruler on the edge of the top to mark the end of the stitching line on the fold.

fleece bound quilt corner

Here's a finished corner. The miter is turned right side out, one inch of fleece is folded to the front and is topstitched near the cut edge. Fleece doesn't ravel, so there is no need to turn the cut edge under.

A fleece back is a quick way to finish a quilt, just make sure you support the fleece so it doesn't stretch out of shape before you get the layers stitched.

Sunday, September 17, 2006

Third Sunday Project Linus Group

prequilted fabric panel

It's that time again. Our Project Linus group met at JoAnns this afternoon. More 7½" heart blocks were made and some were put together with crayon squares. I took this prequilted panel from the fabric that Jessie gave away last Saturday and a piece of yellow for binding (from fabric bought with the TeleComm Pioneer's money) and finished a quilt. It went home with the twins to get laundered before delivery. I picked pet hair off the entire time I worked on it and there was still more!

square in a square quilt top

Jodie brought a bag of donations from an AT&T contact who told me she had "material". Much to our surprise, we got quilt tops and matching flannel fabric. This square in a square top is part of the donation. One of our group this afternoon added the outer border to finish it and make it a little bigger.

squares of striped fabric make a quilt top

There were cut squares of fabric ready to make tops. This striped fabric made 2 eye-catching quilt tops finished with a brown border. A variety of black and white fabrics, finished with a red border made a bold quilt top.

sewing quilt squares

Christy likes to do her own thing with precut squares, with pleasing results. She turned these floral and lavender squares into blocks with 2 half square triangles. We have to wait to see what interesting design she creates.

knitted baby afghan

A mother and teen daughter donated this knitted baby afghan and stayed to tie a couple of quilts. The pastel afghan makes a very pale photo. Look closely to see the heart design formed by the stitch pattern. It is a beautiful afghan.

Thursday, September 14, 2006

Looking for Packing Tape

yarn skeins

I drove across town today to deliver a grant application to Wal-Mart. After delivering the application, I went in search of packing tape since I needed a new roll. My path happened to go by the clearance aisle where yarn was falling off the shelves . . . Feet, where are you going? There's no packing tape here.

I started looking for yarn for Project Linus and found 1 skein of Red Heart Super Saver for $1 and a skein of Red Heart Baby Soft for $2.

Some Red Heart Symphony caught my eye and I started thinking of Christmas gifts. Some Homespun joined the Symphony. I won't say what I will like make with these as some potential gift recipients read my blog. But I will reveal they were all $3 a skein.

Bernat Super Stripes yarn

The prize was this skein of Bernat Super Stripes. This colorful boucle yarn was marked down to $1. It should make a great hat or two for charity. Can't you picture a little girl in a pink and black hat? It scanned at $3.88, but the cashier quickly adjusted the price when I pointed out the clearance sticker. Yet another reason for not using the self-checkout.

I finally got the packing tape after my extended session digging through the clearance yarn.

Another Project Linus volunteer told me about Wal-Mart's community grant program. I shop at Wal-Mart infrequently, but the possibly of a donation for Project Linus motivated a trip. The grant application is simple, less than a page long, but you will need the organization's tax ID number. Ask for the community involvement coordinator. Now to see if we get a donation.

Wednesday, September 13, 2006

Spotlight: Care Wear

Care Wear is a nationwide network of volunteers that provide handmade baby items to hospitals. Founder Bonnie Hagerman started providing clothing for premature and low birthweight infants in Washington, D. C. area hospitals in 1991. High demand for preemie-sized items led to recruiting of more volunteers. Volunteers are urged to deliver completed items to hospitals in their community.

The Care Wear website has a list of participating hospitals and the types of items they need. Be sure to read the "join" page for important information about making and delivering items. Guidelines for contacting a non-participating hospital about donating items are given. Be sure to determine what the hospital needs before making a lot of items.

A variety of sewing, knitting and crochet patterns are available on the Care Wear website or you can use patterns from other sources. Crocheters may like the half-double crochet preemie cap on my Craft Patterns web page.

For other organizations that need your handcrafting skills, visit Handmade for Charity on my main website.

Tuesday, September 12, 2006

Scrappy Hearts Update

scrappy hearts quilt top

Over the last 2 days, I frogged the upside row and finished stitching the scrappy heart blocks together. I trimmed the edges so everything is nice and straight. The setting triangles were cut oversized, so the blocks float and there will be ½ inch between the corners of the heart blocks and the first border.

scrappy hearts qult closeup

Here's a closeup of some of the blocks so that you can see the fabrics better. Now I need to decide exactly how to do the border. I have strips of several of the heart fabrics and lots of black. I think I was originally thinking of sewing the strips end to end to create a narrow border of the various colors and then a wide black border on the outside. I need to see just how long those strips are. I also have several heart blocks left, which creates more possibilities.

Review: 100 Best Full-Size Quilt Blocks & Borders

100 Best Full-Size Quilt Blocks & Borders is a large hardback book that opens to reveal spiral bound pages. All the blocks are 9 inches square and the complete block is drawn full size. The facing page has some high level instructions, a suggested project and photos of 2 completed blocks. The block patterns are divided with about 2/3 pieced and 1/3 applique. Designers Phyllis Dobbs, Mimi Shimp, Lucie Sinkler, and Retta Warehime contributed to this book.

This is not a book for beginners. The instructions provided are high level. There are no rotary cutting instructions. If you hand-piece, you can readily make templates from the block diagrams. If you machine piece, you need to trace the pieces from the block diagram and add seam allowances before cutting your template.

I recommend checking this book out of your local library before you decide to buy it. Flip through it and see what inspires you. There are other books with more patterns than this one has.

Sunday, September 10, 2006

Website Updates - September 10, 2006

ribbed cap

Teen/Adult Ribbed Cap Pattern

I've added a description of how to slip stitch or sew the first and last rows together to maintain the ribbed pattern.

Big Star Quilt

Big Star Quilt Pattern

This pattern has been lurking on my website for months. I've finally modified it for 40 inch wide fabric and added it to the list of craft patterns. The pattern page has graphics that should be friendlier than photos for those with black and white printers. The pattern links to a separate page with photos of two finished quilts. This is the first quilt pattern on my website. I hope you enjoy it.

Both patterns are listed on my Craft Patterns page.

Saturday, September 09, 2006

Second Saturday Charity Quilting

It's that time of month, the second Saturday, what I commonly refer to as my 'quilt until you drop' day. Quilts from Cornerstone, a charity quilting group, met today. Our scheduled hours are 10 to 5 and today, instead of 'dropping', I was still going strong at 5 p.m. I kept working and they were folding up tables and putting things away around me.

scrappy heart blocks

Our fearless leader, Jeanine, had an assortment of 'extras' for us to work on today. I woke up this morning and decided to take an unfinished project to work on.

A Neglected Quilt Project

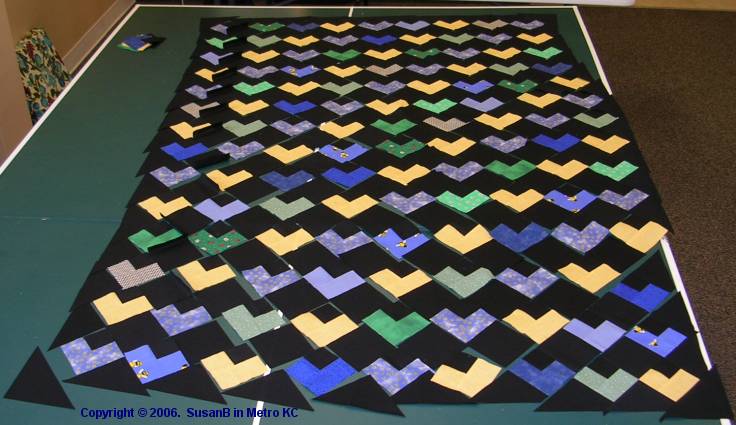
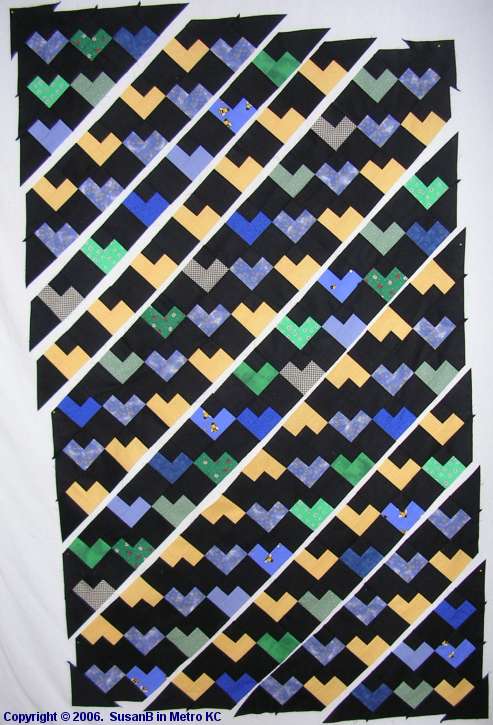
In May 2005, we had a "use up scraps" day where the goal was to use up strips left from various projects. The method was string-pieced squares or whatever we wanted to do. I opted for whatever. I grabbed a bunch of strips, got black background fabric from Jeanine and cut strips of that and started sewing. Sewed for 5 or 6 hours and had a bunch of little heart blocks. I started cutting solid black squares to go with them, but didn't get too far with sewing pairs of 1 heart and one black square. I took stuff home to work on, but basically did nothing but move the blocks and fabric once in a while when they were in the way. For 16 months. My bad.

Scrappy Hearts quilttop partly assembled

It took me a couple of hours today to lay the hearts out on the ping pong table at the church where the group meets. That included cutting the rest of the black squares and the triangles to set the heart blocks with. The photo above shows everything finally laid out ready to sew together.

I sewed diligently most of the afternoon, working past our 5 p.m. stop time to get enough sewing done that I could easily transport the pieces without fear of jumbling my layout. The picture on the left is how the top now looks, at home on my design wall. Yes, one row is upside down. I will fix that.

Booty! I Got Booty!

Look what Jessie gave me!

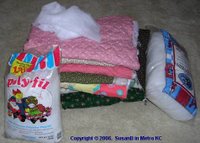
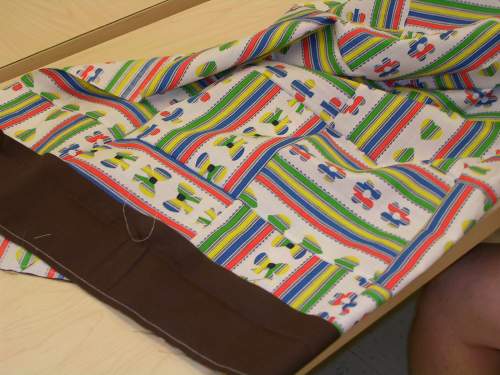
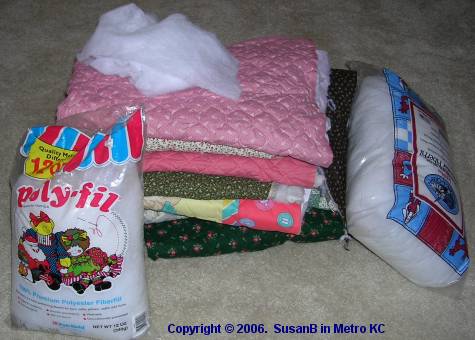
Despite returning the finished flying geese top, book and ruler that I brought home last month, I came home with more stuff than I left with. Jessie was cleaning out some stuff and I wound up with most of what Jeanine didn't want. Not in this picture is a skein of yarn my friend Jodie brought me. I'll probably make a hat from that.

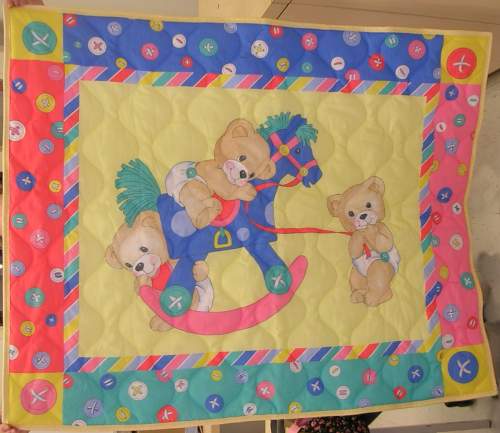
The fiberfill and prequilted fabric is all from Jessie. There is one baby panel in the fabric and the rest is all-over prints which will make good blanket backs for Project Linus.

The batting scrap on top of the fabric is a remnant from today's quilting (something someone else worked on); they've learned I'll take any batting scrap, no matter how small. I have dreams of making some stuffed items for charity. If the fiberfill and batting scraps start taking over, I give part of them to my stepsister who does more than dream about stuffing things.

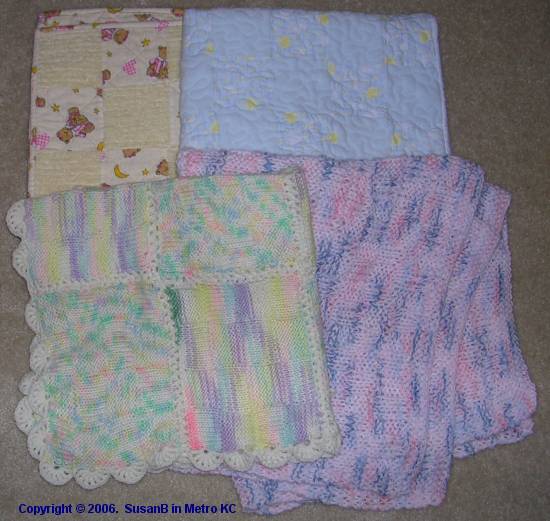
Project Linus Booty, aka Blankets

blankets for Project Linus

Jeanine gave me these 4 blankets for Project Linus. The quilts are a simple one-patch strip pieced with 2 different fabrics. The upper left quilt alternates chenille and flannel patches. The upper right quilt alternates solid fleece and a print flannel patches. The 2 knit afghans are made in a checkerboard design, alternating squares of knit and purl. The afghan on the lower right was knit in one piece. The afghan on the lower left is knit checkerboard blocks that are crocheted together and a crocheted edging added.

Thursday, September 07, 2006

Crocheted Hats

5 crocheted hats

I hope everyone had a great Labor Day! Every time I'm away for even 2 or 3 days, it takes me a while to catch up and get back in my groove. I'm not sure I'm quite there yet.

About a month ago, I decided it was time to start making some hats for charity. In the past our TeleComm Pioneers have collected them and taken them to the Caps for Kids coordinator. The yarn shop that coordinated Caps for Kids in the metro Kansas City area closed last year. So last year the hats went to City Union Mission. City Union was glad to get them and wanted more.

The blue hat is a very scrappy version of my Teen/Adult Ribbed Cap pattern. The purple and green hats on the right are made with Jiffy yarn. The pattern is the Double Crochet Hat at Stitchin's Caps for Kids page. I was never happy trying to make it with worsted weight yarn, but give me a skein of bulky yarn and a size K hook and I can make one in 2 hours. I have modified the pattern a little. I do 4 increases on round 4 and 4 increases on round 5 instead of the 8 on round 4. Also, I just do 14 rounds of double crochet (no single crochet rounds) and put stripes whereever.

2 crocheted swirl skull caps

I made this pink hat while I was away for Labor Day. I started the green one Tuesday night and had a good start on it before I headed home on Wednesday. The 2 hats on the left in the top photo are the same pattern. It is an original design in half double crochet with front and back post double crochet and a little single crochet. Hopefully, I'll get the photos cropped and the pattern typed up for the website soon.

Saturday, September 02, 2006

Slipping Out of Quilting Mode

I spent time this morning doing various chores, partly getting ready to go out of town for a few days. My feet are still telling me they don't like standing as much as I have the last couple of days. By late morning, I had to take a break. After a quick snack, I quilted about 45 minutes. I finished machine quilting one of the Project Linus crayon tops that I started about 2 weeks ago. It's backed with fleece. I need to trim the fleece, turn the cut edge over the border and stitch it down. When I get that done, I'll take a picture to post.

I hope everyone has a great Labor Day weekend. I'm heading south for a family dinner tomorrow and will stay with my mom a couple of days. We're going to Silver Dollar City in Branson, probably on Tuesday. I won't do any quilting while I'm gone, but I will take other handwork, reading material, and the computer. I won't get on the Internet much with only dialup access, but maybe I'll get inspired to work on a writing a pattern for the website or drafting a blog article or two to publish after I get back.

Friday, September 01, 2006

In Quilting Mode

flying geese quilt top

I finally got back in quilting mode this week. Today I finished the flying geese top that I showed you the blocks for on Wednesday. It looks a lot like the one I finished the second Saturday of July, but the geese fabrics are arranged slightly differently. The credit for the fabric combination goes to Jeanine, the coordinator of our Quilts from Cornerstone group.

pink and green 9 patch quilt blocks

To keep my chain of pieces going, I stitched these pink and green 9 patches together in between parts of the geese top. I made a queen-size Burgoyne Surrounded quilt from these 2 fabrics. It's kind of hideous. I don't know what I was thinking when I bought the fabrics. It's not that they clash; they're just overwhelming in quantity. Anyway, I found the leftover pieces in my scrap basket and I'm trying to figure out something to do with them. I was hoping that sewing the 9 patches together would help inspire me, but nothing yet. I'll leave them on the design wall to haunt me and see if that helps. I have a few more small pieces of the pink and green fabrics, but I'm going to have to find something to go with them.