Showing posts with label Project Linus. Show all posts

Tuesday, February 06, 2024

What I Did on Vacation - 2023

Last fall I spent 2 weeks in Albuquerque with my friends Wanda & Roger. Some crafting happened while I was there, but no pictures were taken. A third friend, Phyllis, didn't get to see the quilt tops and requested pictures after I got home and took photographs. So this post is for Phyllis.

First, I finished stitching together the quilt top from the September kit from our 3rd Sunday Project Linus Group. (Yes, we're still meeting on the third Sunday of the month and sewing quilt tops for Project Linus.) The official name for the design is Boomerang, but it was soon known as the dinosaur quilt.

Here is a closer view so you can better see the dinosaurs.

Then there were quilts from a Spongebob Squarepants pillow panel. I cut up the pillow panel in 2022. Found coordinating fabric in my stash. Took photos and scanned fabric to import into Electric Quilt. All in the middle of 2022. Then I set it aside to work on something else and there it languished.

The Spongebob pillow panel was polyester. See-through thin polyester. Luckily, I had some solid white polyester fabric in my stash (inherited from the stash of Wanda's mom). I layered the pieces from the pillow panel with the solid white polyester cut to the same size and stitched them together about ⅛" from the edge. This was also done in the middle of 2022 before I set the project aside.

I occasionally stumbled across the Spongebob panel parts; moving them when working on something else. When it came time to choose projects to take on vacation, Spongebob Squarepants quickly went on the list. After getting to Albuquerque, I dusted off my Electric Quilt design skills and created designs to use the pieces from the pillow panel.

I made 2 Spongebob Squarepants quilt tops from the pillow panel. I used a blue background and orange border on the first one.

And two closer shots to better show the details.

For the second Spongebob Squarepants quilt top I switched the blue and orange, so the second one has an orange background and a blue border.

The smaller panel pieces are different on the second top. Here are two closer shots to better show the details.

Now I'll confess that I started this blog post 3 months ago. Didn't quite finish it on the first writing session and kept procrasting or getting sidetracked by other things.

I currently have 6 Project Linus quilt tops waiting to become quilts. The two Spongebob tops are on the top of the stack and will hopefully get finished in the next week and half to turn in at our 3rd Sunday group meeting this month. The dinosaur quilt got finished and turned in last month.

Sunday, February 17, 2013

Project Linus - Third Sunday Group - February

Our Fast & Fun quilt top for February 2013 was Up & Down. Our Third Sunday group met today at JoAnns Fabrics in Independence, MO to work on Project Linus blankets.

Up & Down is a 40" by 48" quilt featuring 2 coordinating fabrics plus an accent fabric. Jodie had plenty of kits ready complete with instructions for us.

Jodie's Up & Down quilt top

We had a small but dedicated group today. Jodie was the first to finish her quilt top featuring a Disney print. She used a striped fabric for the accent.

Look below for a close up picture of the fabrics in this quilt top.

Jodie's fabrics
Marie's Up & Down quilt top

I've noticed that Marie frequently picks kits with blue fabric. Her quilt top features another Disney print with a (different) striped accent fabric. The third fabric is the same blue/aqua tone-on-tone print that was in the Diagonal Puzzle quilt I made.

I'm sorry the picture is blurry. I don't know if it was my camera or the quilt top that was moving. Maybe both.

SusanB's Up & Down quilt top

I've been picking kits based on my supply of potential backing fabrics I have in my stash. Today I picked one that I think I can pair with a baseball print on the back for something that will appeal to the boys. The baseball print has a light blue background, but I think it will work.

Want to know what is on the red and blue prints in my quilt top? Look at the picture below.

SusanB's fabrics

Can you see them? Sharks! Some boy (or girl) is going to love those sharks!

I had an uneventful drive home until I was about ¼ mile from my neighborhood entrance and came upon 3 deer crossing to the right side of the road. No problem, it was a 35 mph zone. What worried me was the 4th deer that was still on the left side of the road. Fortunately, it stayed there while I and the car behind me drove by.

I see deer around my neighborhood occasionally, but it's always a surprise. I enjoy seeing them, but I have neighbors that wish they weren't around. Seems the deer are rather fond of their garden.

Saturday, February 16, 2013

Quilting Update

I finished quilting both Diagonal Puzzle and Life's Ups and Downs, so they are ready to turn in at our Project Linus meeting tomorrow.

Diagonal Puzzle Quilt

Diagonal Puzzle quilt

On Diagonal Puzzle, I ditch quilted the edge to edge seams between the horizontal rows of blocks. Then I quilted zig-zag lines from top to bottom, first going through the center of the black squares on one row, then zagging at a right angle across the solid block on the next row arriving at a black square corner and turning again.

Once all the zig-zags were quilted through the black squares, I used a chalk pencil to mark half way between the points of the zig-zags and quilted a set of zig-zags through those points so the stitching was close enough to hold the batting securely. You can see that better in the close up picture below.

Diagonal Puzzle quilt detail

Life's Ups and Downs Quilt

bargello quilt

On Life's Ups and Downs, I first ditch quilted some of the vertical seams to stabilize the quilt. My goal was to have the vertical stitching about 5" to 6" apart, but I had to work with the width of the pieced strips.

With the quilt stabilized by the vertical stitching, I quilted horizontal waves across the quilt. First I stitched waves through the yellow lizard print and the 2 waves of continuous green (the only 3 fabrics forming an unbroken wave). With those lines as a rough guide, I quilted more waves to divide the area and leave no spot more than 4" from a line of quilting. A closer view is below.

bargello quilt detail

I used Pellon Quilter's Touch polyester batting in these quilts. I bought a 60" wide by 20 yard long roll at JoAnns when it was a door buster special on the Tuesday before Thanksgiving. It is a nice batting to work with. Definitely better than the 10 yard rolls of polyester batting that JoAnns sells.

Monday, January 21, 2013

Design Wall Monday - Diagonal Puzzle

On my design wall today are my quilt blocks from yesterday's meeting of our 3rd Sunday Project Linus blanket group.

Diagonal Puzzle quilt blocks

Our Fast & Fun quilt top for January 2013 was Diagonal Puzzle and it proved to be a bit of a challenge. One group member misunderstood the instructions and is creating a totally different design. My seam ripper was my best friend as I kept stitching squares onto the wrong strips and then onto the wrong end of the right strip!

I managed to get all the pieced blocks stitched together and the large solid pieces cut at our meeting yesterday. This morning, I pressed the pieced blocks and arranged it my design wall. If I can keep the pieces turned the right way for the trip from the design wall to the sewing machine, it won't take long to finish stitching it together.

What's on your design wall? Visit Design Wall Monday at Patchwork Times to see what JudyL and many others are working on and add your own Design Wall Monday post to the Linky list.

Sunday, May 27, 2012

Project Linus - Third Sunday Group - May

Our Fast & Fun quilt top for May 2012 was Modern Chain. Our Third Sunday group met at JoAnns Fabrics in Independence, MO last Sunday, May 20, to work on Project Linus blankets.

Modern Chain is a 36" by 50" quilt featuring 2 solid or near solid fabrics and a fun variety of 6½" squares. As always, Jodie had fabric kits and instructions for us.

Modern Chain quilt top - Louise

Louise is back from spending the winter in Texas and picked the kit with green and orange strips. There are some fun prints in the squares and the green and orange is bold.

Modern Chain quilt top - Marie

Marie stitched a kit with red and blue strips. Marie had the same print squares as Louise, but arranged the squares differently. The red and blue strips make a bright, cheery quilt top.

Modern Chain quilt top - Jodie

Jodie stitched a kit with pink and purple strips and some cool print squares. A pretty nifty quilt top.

Modern Chain quilt top - SusanB

I picked a kit with purple and pink strips and some of the same print squares as Jodie's kit. This kit got the squares left after Jodie made the kit she stitched, plus a couple of other prints. The purple strips are a different purple than Jodie's.

The pink strips are almost red and were the only strips in any kit that were not a solid color. I really like the tone on tone strips, but Jodie thought they were less "Modern" than the solid fabrics.

As we were wrapping up to go home, Sandy joined us after attending a graduation party for her grandson. She turned blankets in and picked a Modern Chain kit to take home and stitch.

Sunday, May 20, 2012

Project Linus - Third Sunday Group - April

Our Third Sunday group met today, but let me play catch up and tell you about our Sunday, April 15, 2012 meeting. Our small group of Project Linus blanketeers meets at JoAnns Fabrics in Independence, MO on the 3rd Sunday of every month to make blankets.

Jodie is our dedicated leader and she creates quilt kits for us. There are also quilts ready to tie and quilt tops with backing fabric and batting to create the quilt sandwich.

Our April quilt top project was Fat Quarter Big Blocks, a 38" by 54" quilt top made from 6 fat quarters and 1/3 yard of accent/border fabric. This was a really Fast & Fun quilt top and 5 quilt tops were finished instead of our more typical 2 or 3, or occasionally 4.

Fat Quarter Big Block quilt top

I lost track of who stitched most of the tops, so I'll just dive in and show the tops.

This first one is bright and reminds me of summer. I think it's the combination of the tone on tone green print (grass) and the flowers and butterflies on the navy background that give me that summer feeling.

Fat Quarter Big Block quilt top

Can you say "ORANGE?" Put your sunglasses on before looking at this second quilt top! It screams "orange" and the red prints and green flower print just add to the brightness.

Fat Quarter Big Block quilt top

Stand up and salute the 3rd Fat Quarter Big Block quilt top. Red, white and blue with U. S. flags and a sky blue print. Just picture those flags flying in the breeze. You can't get more patriotic than this.

Fat Quarter Big Block quilt top

With pastel prints and Easter eggs (or are they jelly beans), this quilt top says "Spring." Jodie stitched this top, proving that even the person who writes the pattern doesn't always read and follow directions. She stitched the blocks with all of them oriented the same way instead of rotating every other one 90°.

Fat Quarter Big Block quilt top

Child's Play: with Mickey Mouse, colorful toy trains, and a yellow print with the alphabet, this quilt is for the child in everyone. I stitched the top at our April meeting and took this picture after layering it with a back and batting and quilting. I deliberately strayed from Jodie's written instructions and did the corners differently.

Cars and red flannel

I had a fun Cars™ print on flannel that my sister found at a thrift shop that fit the "Child's Play" theme. It wasn't long enough, so I used some red flannel to lengthen it and used it for my quilt back. I quilted in most of the ditches and stitched an 'X' through the large patches. That is enough quilting for the Warm & Natural batting that I used.

double four-patch quilt

Sandy turned in this Beary Fun double four-patch quilt last month. Isn't it cute? She used the serpentine stitch on her machine to quilt a grid based on the four-patches.

As always, click on any picture for a bigger view.

Monday, May 14, 2012

Design Wall Monday - It's Empty

My design wall has a big empty space today. I stitched together the blocks I had on my design wall last Monday and added borders to create this Fat Quarters Big Blocks quilt top.

Fat Quarter Big Block quilt top
corner of Fat Quarter Big Block quilt top

Here's a view of one corner that shows all 7 fabrics in the quilt top. I really like how these fabrics work together. The top looks so great, I hated to take it down to layer it with a back and batting. But I did take it down, so I can get it quilted and ready to turn in at our 3rd Sunday Project Linus group meeting next weekend.

What's on your design wall? Visit Design Wall Monday at Patchwork times to see what JudyL and others are working on and add your own Design Wall Monday post to the Linky list.

Monday, May 07, 2012

Design Wall Monday - Big Blocks

howling wolves quilt panel

The late news was on when I came upstairs last night and got ready to start a new project. I removed the paisley blocks from my design wall and started looking for fabrics that coordinate with the howling wolves pillow panel that I adopted nearly 4 years ago and haven't touched in almost that long.

I found several fabrics that should work for the design I have in mind. But I need to sit down and do some drawing and measuring and calculating before I cut any of that fabric and I wanted to start cutting fabric to sew.

So I went to my collection of fat quarters given to me by a fellow Project Linus blanketeer a couple of years ago and selected 6 for a Big Blocks quilt. Fat Quarter Big Blocks is the pattern from our 3rd Sunday Project Linus group's April meeting and it is a good one to reduce that fat quarter collection a bit. (I still plan a report on our April meeting, so check back once in a while.) I cut pieces for the big blocks and headed for bed.

Squares Afloat quilt
Squares Afloat quilt detail

This morning, I started by finishing the quilting on my Squares Afloat quilt top from our March Project Linus group meeting. I quilted the floating squares in the ditch and then stitched diagonal lines in the border and sashing areas creating some diamond shapes.

After a break for breakfast and a walk, I started stitching Big Blocks. I quickly had my 12 units stitched and ready to arrange on my design wall.

big block units

I'll experiment with the layout a bit before stitching the 12 units into 6 big blocks and stitching the top together. You can't tell from this picture, but the green accent strip is the green print that I auditioned with the paisley blocks. It was perfect for these fat quarters.

What's on your design wall? Visit Design Wall Monday at Patchwork times to see what JudyL and others are working on and add your own Design Wall Monday post to the Linky list.

Thursday, April 26, 2012

Project Linus - Third Sunday Group - March

Going back in time just a little bit, our Third Sunday group met at JoAnns Fabrics in Independence, MO on Sunday, March 18, to work on Project Linus blankets. The quilt top project du jour was Squares Afloat, another Fast & Fun project with precut kits provided by our intrepid leader, Jodie.

Squares Afloat is a 39" by 48" quilt top featuring 6 rectangular blocks separated by sashing. I found it wise to refer to the instructions frequently to avoid mistakes in my cutting and stitching. Jodie and I produced the only 2 finished tops. At least, the only 2 that I got pictures of.

Squares Afloat quilt top - Jodie
fun fabrics

Jodie chose the kit with bright green and yellow fabrics. The photo to the right shows the fun fabrics with bugs and butterflies. Click on the picture for a larger view in another window/tab.

Squares Afloat quilt top - SusanB
pink, blue and Pooh fabrics

My kit had pink and blue prints with a blue background. To the right is a closer view of the fabrics. Look at the fun Pooh Bear print in the border. Again, click on the picture for a larger view.

Beth V. dropped off some finished quilts and we had quite a show and tell session looking through her bags of quilts. Beth frequently uses batik fabrics in her quilts and the rich colors are beautiful. This strippy quilt inspired me to take a couple of pictures.

strippy quilt in batiks

At first glance, it appears that wide and narrow strips are stitched together, subcut into strips and every other strip rotated 180 degrees before stitching back together. However, on closer examination, I can't detect any repeated fabric sequence in the larger patches. There were at least 2 quilts made like this. Perhaps, Beth used fat quarters and/or limited the number of strips in the strip sets, so she could mix things up.

strippy quilt in batiks - detail view

Here's a closer shot, so you can get a better look at how the pieces fit together.

That was our March meeting in a nutshell. Watch for a report on our April meeting when we finished more than 2 quilt tops.

Sunday, March 18, 2012

Mindbender

I seldom do paper foundation piecing. Too slow and fiddly. I also don't enjoy stitching strips to a muslin foundation to create string blocks.

When I found out that the January project for my 3rd Sunday Project Linus group was string blocks, I said thanks for the warning and started coming up with a plan for something I could do with those 2" strips that didn't involve stitching them on a muslin foundation.

Mindbender quilt

This is what I came up with. I call it Mindbender. Don't look at it too long or it will really mess with your mind.
What I did:

  • Chose 6 fabrics, 3 light and 3 dark.
  • Stitched 6 identical, 6 strip strip-sets, alternating light and dark 2" wide strips.
  • Pressed all the seams toward the side with the light strip on 3 strip-sets and toward the side with the dark strip on the other 3.
  • Cut the strip-sets into 24 squares.
  • Keeping the same fabric at the top, separated squares into 2 groups based on which way the seams were pressed.
  • Cut 1 group of squares on the diagonal from bottom left to top right.
  • Cut the other group of squares from top left to bottom right.
  • Mindbender unit
  • Stitched triangles together to make 24 units.
  • Stitched units together to make 6 blocks.
  • Arranged blocks and stitched together.
  • Added more 2" strips to create borders.

I like this well enough to do another sometime, but will probably do a different border. It's on my list of patterns to write and publish on my website. But don't hold your breath waiting for that as it frequently takes me years to get a pattern on my website. I wouldn't want to cause any misfortune to happen to you.

Saturday, March 17, 2012

A Finish on National Quilting Day

Checkerboard Squares quilt

Today is National Quilting Day. Tomorrow is the 3rd Sunday of March, which means my Project Linus group meets. So I kicked into gear and quilted the Checkerboard Squares top that I made at the February meeting so I can turn it in tomorrow.

I quilted in the ditches of the borders and did a diagonal grid through the blocks. The batting is Warm & Natural and I used some red flannel on the back. Here's a closer look at the blocks and a peek at the back.

Checkerboard Squares quilt detail

I hope you had a quilt-filled National Quilting Day. Happy St. Patrick's Day!

Monday, March 05, 2012

Project Linus - Third Sunday Group - February

Checkerboard Squares, an easy 9-patch quilt, was our Fast & Fun quilt top for February, 2012. Our Third Sunday group met at JoAnns Fabrics in Independence, MO on Sunday, February 19, to work on Project Linus blankets.

Checkerboard Squares is a 41" square quilt featuring 13 nine-patch blocks separated by squares of fun fabric. Jodie had fabric kits and instructions prepared to get us started. Everyone had fun and 3 of us finished Checkerboard Squares quilt tops.

pastel 9-patch quilt top

Jodie's quilt top is uncharacteristically pastel. She usually goes for bright colors, but chose the kit with green and yellow 9-patch blocks separated by multicolor jelly beans and surrounded by a lavender inner border and another multicolor pastel print in the outer border.

red and blue 9-patch quilt top

Patti's quilt top features Batman in the squares separating the red and blue 9-patch blocks, topped off with a fun dotted print in the border.

multicolor 9-patch quilt top

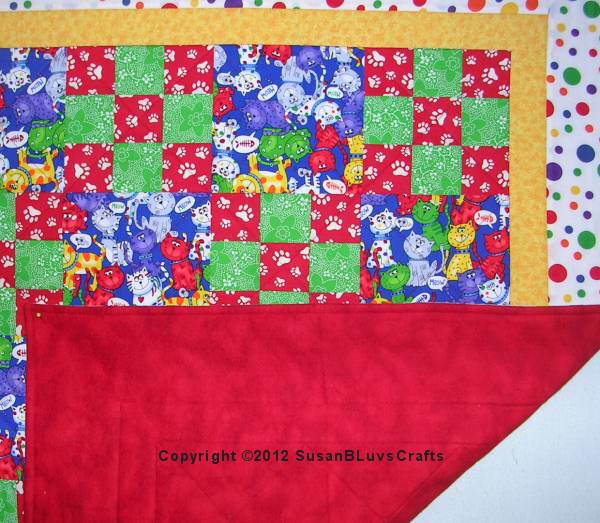
I was drawn to the fun cat print in the kit I chose to stitch. The cat squares separate red and green 9-patch blocks and everything is surrounded by a yellow inner border and a fun, bright multicolor polka dot print in the outer border.

fabrics in quilt top

Here's a close up shot so you can get a good look at all the fabrics in this quilt top. Notice the paw prints on the red fabric. The quilt top is on my design wall waiting to be finished into a Project Linus blanket.

You may click on any picture to see a larger version.

Sunday, October 09, 2011

Strip-O-Rama Quilt Top Complete

Remember our September Fast & Fun quilt top that no one finished at our 3rd Sunday Project Linus meeting? I finally finished stitching mine together and will now reveal that I chose to do a piano key border. Jodie's design had 2 plain borders and I got adventurous. A pattern is just a starting point. Right?

The piano key border is made from the same fabrics that are in the blocks. I stitched more strip sets and cut about half of each strip set into units for the blocks. I arranged the remaining portion of the strip sets and stitched them together to form 2 pieces about 20" wide and 20" long. This width allowed me to cross cut each piece without folding. I cross cut each piece into strips about 5" wide and sewed a strip of each set of fabrics together to make 4 border strips.

For a better look at the fabrics and borders, I offer the photo below.