Wednesday, June 30, 2010

Learning EQ7 - Part 5

Find a list of all the articles in this series on the Learning EQ7 Series page. The sidebar also has a link to the series page.


Video 9 - Print the Lessons

Duration: 1 minute, 21 seconds

The videos are the first step in learning EQ7.

Halfway down the help menu you'll see "EQ7 lessons (PDFs)." Click on that item and a list of the 22 lessons is displayed in a new window. Adobe Acrobat Reader is required to view and print the lessons.

The lessons are easy and short so they are fun to work through. Though targeted at new users, even experienced EQ users will learn from the lessons.

The lessons are divided into 6 categories:

  • Quilts – 6 lessons
  • EasyDraw™ Blocks – 6 lessons
  • Images – 2 lessons
  • Pieced PatchDraw Blocks - 2 lessons
  • Printing – 3 lessons
  • Appliqué PatchDraw Blocks – 3 lessons

Quilts - Lesson 1 - Plain Horizontal Quilt

This lesson is 6 pages long. I spent about 15 to 20 minutes doing it. You can spend more time or less, depending on your experience level and what you want to do.

The list of topics covered in Lesson 1 are:

  • Creating a New Project
  • Starting a Horizontal Quilt
  • Learning How Layout Controls Work
  • Coloring the Plain Horizontal Quilt
  • Understanding the Sketchbook
  • Modifying the Quilt

This lesson is arranged in 2 columns. The right column contains a numbered sequence of steps, describing exactly what to do. The left column contains pictures to illustrate what you should be clicking on or doing in each step. I think all the lessons are arranged like this, but I've only looked at a couple so far.

In this lesson, you create a simple quilt with squares of fabric set together in horizontal rows with sashing. The quilt layout controls are introduced. The CTRL and ALT keys are used to color every square or alternate squares. This also works on the sashing pieces.

This was a very quick and easy lesson. I knew most of this from my limited use of EQ6.
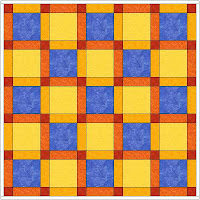
quilt design from EQ7 lesson 1

This is the last design I created in this lesson. I dislike orange, but I'd colored the blocks blue and yellow and the orange went with that.
Monday, June 28, 2010

Good Intentions, Incomplete Follow Through

The Kansas City Project Linus chapter had a special blanket making day on Saturday to make weighted blankets for autistic and special needs children. I wrote about weighted blankets for autism early this month, so I won't cover details of the blankets here.

I spent last week getting ready for the blanket day, in between various computer and TV based sidetracks.

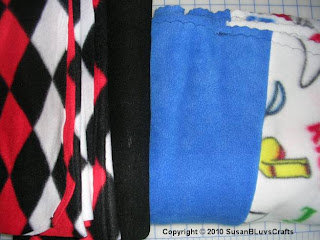
Debby gave some fleece back to me at our 3rd Sunday group meeting. This fleece came in early this year. A few of us worked on stitching it into blankets in February and a bunch went home with people to finish.

fleece to stitch

Debby's sewing machine did not like stitching on the fleece, so she brought these back. The blue and white one just needed the seams stitched down with some embroidery. The red, black and white one was still in 3 pieces.

My goals last week were:

  1. Finish the fleece blankets Debby brought me and turn them in Saturday
  2. Crochet edgings on 3 fleece blankets and turn them in Saturday
  3. Finish the hat I was crocheting and start the next one
  4. Pick fabric for 3 weighted blankets
  5. Finish 1 weighted blanket, ready to turn in on Saturday
  6. Start 2 weighted blankets: sew the side seams and iron under the ends so they are ready to add the Velcro and stitch the pockets on Saturday
  7. Take fabrics scraps to Nancy on Saturday.
  8. Watch the rest of the EQ7 videos
  9. Write 3 or 4 blog posts

So how did I do?

    machine stitched fleece blankets
  1. Finished the 2 fleece blankets that Debby returned to me.
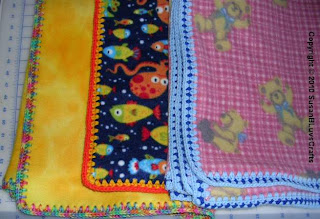
  2. 3 fleece blankets with crocheted edgings
  3. Crocheted edgings on 3 fleece blankets.
  4. Turned in 9 fleece blankets on Saturday, including 4 that were finished before last week.
  5. Finished crocheting hat #27 and started knitting the next one
  6. Jungle animals fabric
  7. Using jungle print with pink elephants. started a weighted blanket with a denim back. Did not get the vertical stitching from Velcro edge to Velcro edge done until our blanket making day on Saturday.
  8. teddy bear & cowboy hat fabrics
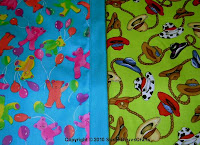
  9. Started 2 weighted blankets using an aqua twill back. The fronts are 1) colorful bears on aqua and 2) cowboy hats on lime green.The side seams were stitched and the raw edges were ironed under ready to add the Velcro and stitch the pockets on Saturday.
  10. I took the fabric scraps to Nancy. Nancy loves making string quilts and I love getting the scraps out of my house.
  11. Watched the rest of the EQ7 videos
  12. Only wrote 1 blog post, the 4th installment in the learning EQ7 series.
  13. Spent way too much non-productive time sitting at the computer.

Between the TV and the computer, there are so many other things (time wasters) that are easier and/or more fun to do than writing a blog post. I had good intentions but lacked motivation.

There were about 20 people at our Saturday blanket day and about 30 or 40 weighted blankets were finished. I was busy working and failed to get any pictures.

Saturday evening I told my mom I don't ever want to do that again. 1) I don't get much pleasure from making the weighted blankets. Picking fabric is the only remotely creative thing about them. I'd rather crochet, knit or quilt. 2) I sewed for over 5 hours, sitting with my machine too high. The bed of my machine was at shoulder height and all the stitching lines were about 40 to 45 inches long, so there was a lot of fabric fed through the machine, over and over.

After I unloaded the car at home, I collapsed on the sofa and within a few minutes was too stiff and sore to move. It's been a long time since I've worked so long with my machine at such an un-ergonomic height. Definitely not a good thing.

Tuesday, June 22, 2010

Learning EQ7 - Part 4

Find a list of all the articles in this series on the Learning EQ7 Series page. The sidebar also has a link to the series page.


Video 7 - Working on a Project and Printing

Duration: 4 minutes, 43 seconds

This video started with a review of previous lessons. The following design capabilities were introduced.

  1. The Swap All Colors tool changes one color (fabric) to another all over your quilt design. For example, click a pale orange on the color/fabric palette then click a yellow patch on the quilt. All the yellow patches are now colored pale orange.
  2. When using the Set Block tool, if you hold the ALT key when you click on the quilt, the block will be set into every other space on the quilt.

Remember to click the 'Add to Sketchbook' button to save your design when you are done designing.

To print your quilt, click the 'Print' button and choose 'Quilt.' A window appears that displays the quilt, quilt name and printing options. Quilt names and project names are different. Video 5 showed how to name a quilt in the Sketchbook.

You can preview the printout before printing. You can also print the fabric yardage for your design.

Before printing a pattern, you have to select the part of the quilt you want to print a pattern for. Click the 'Select' tool (the arrow) at the top of the toolbar in the right column and then click on a block. A frame appears around the block to show it is selected.

Click on the 'Print' button and there are now options to print the Block, Foundation Pattern, Templates or Rotary Cutting instructions.

Video 8 - What If I Just Want a Pattern?

Duration: 3 minutes, 38 seconds

You don’t have to design a quilt to print a pattern. You don’t have to create a project or open an existing project. Instead, go to the block library and add the block you want to the Sketchbook.

Close the Block Library and open the Sketchbook. Click on the block in the Sketchbook and click the Edit button to open the block in the block worktable. Click the 'Print' button and you have options to print the Block, Foundation Pattern, Templates or Rotary Cutting instructions.

Type the size you want to make your block and click preview. If you are printing templates, you can rotate and move the individual pieces. If you can move everything so it fits on fewer pages, the blank page won’t print.


I'll talk about Video 9, Print the Lessons, in Part 5. Continuing to the 10th and last video . . .


Video 10 - Find Help Yourself!

Duration: 3 minutes, 8 seconds Video 10 introduces some of the ways to get help in EQ7. To get started, click 'Help' on the top menu bar and check out the options. This is where you go when you want one of the lessons provided in EQ7.

Also under 'Help' is "How Do I?" with How to's on Blocks, Quilts, Images, Printing and General topics. Inside each section are step-by-step instructions for things they think we may want to do. You can print each topic, if you like.

The dialogue windows that pop up for various tasks have a help button in the lower right corner. Click on that button and you'll go straight to the help page for what you are doing.

On the top toolbar, the button with the question mark turns Dynamic Help on and off. Click to turn Dynamic Help on and then hover the mouse pointer over any button. Information about what that button does will be displayed. Click the button with the question mark again to turn Dynamic Help off.

Monday, June 21, 2010

Project Linus - Third Sunday Group - June

Sailboat Quilt - Debby

Our third Sunday Project Linus group sailed yesterday. We pieced quilt tops with sailboats on them. Debby made the quilt above from a kit from another Project Linus blanket group. Jodie wrote a pattern and cut kits for our group.

island theme print

Debby found a cute island themed fabric to back her sailboat.

Sailboat quilt top - SusanB

I had the honor of finishing the first sailboat top yesterday. Yes, my sails are blowing east instead of west. Most of the fabrics in the kits were the same, so I chose to be different.

Simple Strips quilt - Sandy

Sandy brought 2 finished quilts to turn in. She found a striped fabric to back her Simple Strips top from last month.

Sandy's other finished quilt was her de-wonked Wonky Quilt top. It's the one with the giant polka dots in the center squares in last month's 3rd Sunday report.

5 fleece blankets - Sandy

Sandy also turned in 5 finished fleece blankets.

Debby tied 2 of her quilts yesterday afternoon. First, her Wonky Block quilt with a wonderful backing fabric.

Wonky Block quilt - Debby

And Debby's Happy Block quilt. Look at the great flannel print she used on the back. It has all of the colors in the top.

Happy Block quilt - Debby

Stuff Came Home with Me

blanket group supplies

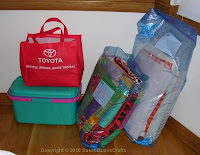
Jodie's out of town next month and I volunteered to be substitute group leader. I brought home a bag of quilts ready to tie, a bag of quilt tops with backs and batting, quilt tying supplies in the turquoise tote and a red Toyota tote bag with next month's quilt kits.

more fleece

Blizzard fleece is on sale for $3 a yard this week at JoAnns. I couldn't resist and bought 6 blankets worth. I only had about 18 blankets worth left in my stash.

Wait a minute. I'm trying to clear things out to get the house ready to sell next spring. Whoops!

Saturday, June 19, 2010

Joan's Trick

What do you do when your quilt top is 44" wide by 68" long and your backing fabric is 60" wide but only 66" long? I use Joan's Trick and create a diagonally pieced back.

Our 3rd Sunday Project Linus group meets tomorrow and I have woefully little ready to turn in. I promised Jodie I would get a blanket ready to tie. My Simple Strips top I brought home from our May meeting is the only quilt top I've finished in the last month, so I got to my loft sewing area this morning to work on it.

diagonally cut backing fabric

I found this lovely magenta corduroy in some donated fabric. It was extra wide, but not quite long enough. So using Joan's Trick, I cut the fabric on the diagonal and shifted the pieces to make it longer and narrower.

quilt ready to tie

I used the pillowcase method to layer the quilt and finish the edges. This is a large Project Linus blanket and I decided to partially quilt it. I quilted the ditch by the border and the 2 long seams. This stabilizes the layers a bit and will make it easier to tie.

John Flynn documented a formula for Joan's Trick. It is on the free lessons page on his website. Scroll down to the section titled "Diagonal Pieced Back" for the story and a link to print the formula and instructions.

Thursday, June 17, 2010

Knitting Club - June - 3rd Thursday

Our twice monthly gabfest known as knitting club met this afternoon. We had a small, but talkative group today. Things started with a giveaway of 3 brand new skeins (plus a small bit of a 4th) of vintage Spinnerin Acrylic yarn from Audrey.

Spinnerin Acrylic

Connie wound up with the yarn, but didn't want all of it. I took 1 skein. The yarn is 2 fine, fuzzy strands and it looks like mohair. I plan to combine it with a strand of worsted weight yarn to make some quick hats.

snowflake ornaments - Margaret

Margaret crocheted snowflake ornaments. She is about half way to her goal of 400. She'll give away 75 at a family gathering in August. The rest will go to friends, fellow church members and just about anyone she comes in contact with at holiday time.

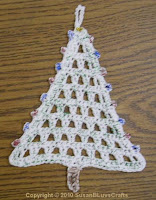
tree ornament - Margaret

Margaret stiffens and paints the ornaments to finish them. She happened to have a few of last year's Christmas trees with her and got one out so I could photograph it.

Liberty embroidery - Gayle

Our library staffer, Gayle, was working on some punch needle embroidery. It's a star with the word Liberty.

Audrey, Sandy and Kathy were working on Indian hats. See my report on our last meeting for an explanation of the project. Kathy wove in yarn ends on 2 hats to finish them. Sandy finished the hat she was knitting and gave it to Audrey. I believe Diane brought Audrey a hat or 2.

quilt top - Diane

Diane brought some eye-catching show and tell. She hand pieced this quilt top. Few of us hand piece quilts these days, so it's always special to see a hand pieced quilt.

knit shawl - Connie

Connie brought not one, but 2 shawls in progress. The one above was show and tell.

Sunday Market Shawl - Connie

This is a Sunday Market Shawl that Connie worked on today. The yarn is Noro Cash Iroha and the free pattern is available from knitfish.

Cathy did some experimental knitting with sock yarn. The first couple of rows knitted in the round always take extra effort. Once a few rounds are knitted, it behaves better.

knitting experiment - cathy

Cathy is experimenting to see if she can start her cuff ribbing on straight needles and then switch to knitting in the round on double point needles. Most of this ribbing was knit on straight needles. The sides to be seamed are not visible in the picture, but they are on the right.

Me? I was working on my Toe-Up Hermione's Everyday Socks. I'm still working on the gusset, so they look a lot like they did in Color Pools. I spend most of my stitching time working on charity projects. If it wasn't for knitting club, I might go weeks without working on my socks.

Wednesday, June 16, 2010

Bunny Roundup

I spent this morning packing up unsold garage sale items and rounding up dust bunnies. I use 2 folding tables by my sewing machine to support quilts. The tables were still in the garage and I wanted to round up the dust bunnies before putting the tables back.

dust bunnies

The dust bunnies are part of why I procrastinate on putting things back to their pre-garage sale state. The 2 folding tables have U-shaped metal legs. I wrap the legs with strips of felt to protect the wood floor.

table leg wrapped in felt

I take the felt off to use the tables on concrete for the garage sale. It's not hard or time consuming to rewrap the table legs, but I always put it off.

The tables are a pain to carry up and down stairs, which may be the real reason I put it off. They are fairly light, compared to the hard plastic tables that are so common today. The tables fold in half and have a handle. But they're 30" wide and I'm short, so it's a struggle to not drag them on the floor when I carry them.

I still have to rewrap the legs on one table. Then I can get back to some quilting.

Tuesday, June 15, 2010

Learning EQ7 - Part 3

I created a Learning EQ7 Series page to make it easy to find all of the articles in this series. There is a link to the page in the sidebar.

Adding Fabrics in EQ7

I want to thank Sandi at Piecemeal Quilts for her wonderfully detailed comment on Learning EQ7 - Part 2. She provides links to several sources for fabric palettes you can add to EQ and links to instructions for importing JPG fabric images.

Judy Laquidaria at Patchwork Times wrote about Importing Fabrics into EQ7 today. She took a photo of fabrics she planned to use in a quilt and imported them to use in her quilt design.

Video 5 - Naming a Project Before Designing

Duration: 6 minutes, 23 seconds

To make your project easy to find, name your project, then start designing. When you start EQ, a window displays prompting to type a project name to start a new project.

Everything you add to your sketchbook will be saved automatically with your project. When you exit EQ, you don’t have to save first. Everything in your sketchbook is already saved.

To continue working on a design when you start EQ again, click the "Open an existing project" tab and select the project you want to work on. To put a quilt back on the worktable, you select it in the Sketchbook and click on Edit. When viewing a quilt in the Sketchbook, click the Notecard button to name the quilt design.

This video introduced some capabilities used in setting blocks in your quilt.

  1. When using the Set Block tool, if you hold the CTRL key when you click on the quilt, the block will be set into all the spaces on the quilt.
  2. The Erase Block and Symmetry tools were demonstrated. The Symmetry tool flips and rotates all the blocks to create 16 different designs.

Video 6 - Opening a Project

Duration: 4 minutes, 22 seconds

When you start EQ, close the "Tip of the Day" window. On the next window, click the "Open an existing project" tab and select the project you want to work on. The project sketchbook will open. Click the quilt you want to work on and click edit to put the quilt on the worktable.

Make changes to the design and click the "add to sketchbook" button. When you look at the sketchbook, you will see the original design before editing and your new design that you just added.

To make a new quilt in a different style, (e.g., with the blocks on point instead of horizontal), click Quilt –> New Quilt and choose a style.

Click the layout tab under the quilt to adjust the number and size of blocks. Return to the Layer 1 tab to set blocks and work on your design.

To change projects, click File –> New and the window to create or select a project is displayed.


These 2 videos covered more than just creating a new project and opening an existing project. They also revealed some of the basic quilt design tools and how to use them.

Each video contains some review of what was covered in the previous video to help reinforce key points. If you watch 2 or 3 videos in a row, it's a bit redundant, but a good refresher if you come back at a later time.

Back to Hooks and Needles

The neighborhood garage sale was not a success. I'm still working on putting away the leftovers. It's not a fun job and I let it drag out a few days. If you want to know more about the garage sale, you can read about getting ready and sale day on my other blog.

I've spent the last couple of days doing not much of anything. The garage sale was work. I managed to pick up a crochet hook and finish a fleece blanket and I have a hat in progress.

Thursday, June 10, 2010

Taming the Fleece

I'm busy getting ready for our annual neighborhood garage sale this Saturday. We've got road construction to discourage people from coming. If we also have bad weather, it may be a tiny group of shoppers.

Since little crafting is going on, I'll tell you about turning yards of fleece into blanket sized pieces. I bought about 40 yards of fleece the day after Thanksgiving and other Project Linus donations were added to that. I had a collection of bags that looked like this.

yards of fleece in bags

Several yards of fleece does not fold compactly. It just flops around and looks messy. Half a dozen bags of fleece occupied a large spot in my guest room until I started cutting it up a couple of months ago.

cutting tools

Good tools make things much easier.

  • A large rotary cutting mat.
  • A 60 mm rotary cutter, big enough to cut through 4 layers of fleece.
  • A 3 foot long O'Lipfa rotary cutting ruler.
  • A 12.5" square ruler

Start by determining the length of the piece of fleece. Decide how many and what size blankets it will become. On a large piece, I do a rough estimate, cut off 2 or 3 blankets and measure again.

I lay the fleece, folded in half, on the cutting mat. I place the 3 foot ruler where I want to cut and use the square ruler to make sure the long ruler is perpendicular to the fold. Then I slice.

I fold each blanket-sized piece with the selvages together. I fold a second time, perpendicular to the first fold, so I have 4 layers, with the selvages all on the same side. I align the folds on the grid lines on the cutting mat. I cut off the selvages and trim the cut edges so the sides are straight and the corners are square.

Tip: when a rotary blade starts getting dull it pushes fuzz into the mat while it still cuts through the fleece. Some sticky package tape will pull the fuzz out. Or one of the sticky lint rollers.

fleece folded neatly

Cut into usable pieces, the fleece folds neatly and occupies less space. When I want to make a blanket, I pick a piece and get started. No wrestling with a large piece of fleece, cutting off selvages or squaring up the piece. No more unruly mess; the fleece is tamed.

Tuesday, June 08, 2010

Learning EQ7 - Part 2

Find a list of all the articles in this series on the Learning EQ7 Series page. The sidebar also has a link to the series page.


Video 3 - How to Use the Libraries

Duration: 4 minutes, 18 seconds

Open a library by choosing it from the Libraries menu on the top menu bar. This opens a window where you view the library contents.

Categories are listed in a column on the left and you scroll up and down through the categories. Expand a category to display the styles it contains by clicking the plus (+) sign next to the name. For example, a few styles in the category Contemporary Pieced Blocks are: Fans, Houses, and Kaleidoscopes.

Items from one style at a time are displayed and there is a horizontal scroll bar to scroll through the items in the style. The name of the current category and style are displayed at the top right of the window.

To use an item in a design, you click on it and then click "Add to Sketchbook" to take it out of the library and put it in the sketchbook.

Video 4 - Using the Project Sketchbook

Duration: 5 minutes, 54 seconds

Once you have added design elements to the sketchbook, you can use them in your quilt designs. To add blocks to your quilt, first close the sketchbook.

In "work on quilt" mode, click the "Set Block" button on the right column. A window with the blocks in your sketchbook appears. Click on a block to select it and the outer border is highlighted. Then click on the quilt to set the block.

The top toolbar has 2 Sketchbook buttons. "Add to Sketchbook" has a big red arrow pointing up and "View Sketchbook" has a pair of glasses. Be sure to locate them because they are used frequently.

Tip: if you want to know what a button is for, move the mouse cursor so it's on the button and hover there. Information about the button will appear in the status bar at the bottom of the window.

When you click the "View Sketchbook" button the Project Sketchbook window displays. You choose between viewing the following items:

  • Quilts
  • Blocks
  • Fabrics
  • Colors
  • Embroidery
  • Photos
  • Thread

The list is similar to the list of available libraries, except the sketchbook stores Quilts (i.e., designs) and the library has (quilt) Layouts ready to fill with blocks and fabrics to create a design.

To add fabrics to your quilt, click on one of the coloring tools in the right column. Choices are: Paintbrush, Spraycan, Swap All Colors and Eyedropper. The Paintbrush is the easiest to use

Clicking Paintbrush displays the default palette of fabrics that are always available to use. Use the scrollbar at the bottom of the fabric palette to scroll all the way to the end and find the fabrics you added to the sketchbook. Click on a fabric to select it; then click on a patch on the quilt design to set the fabric in the quilt.


So far, the EQ7 videos have covered basic concepts and functions of the software. All very simple, yet incredibly important to understanding how to design with the software.

I only did very simple designs in EQ6. I used a couple of blocks from the library or drew my own very simple block. I used the default palette of fabrics. I knew you could add more fabrics to the library, but I never took the time to figure out how to get more fabrics into my design!

These videos make adding more fabrics to your sketchbook so you can use them so clear. I added blocks to my EQ6 sketchbook. I don't know why it never occurred to me to add fabrics from the library to my sketchbook. I feel like a bit of a dunce.

Monday, June 07, 2010

Simple Strips Top Finished

Simple Strips quilt top

Today, I finally sat down at the sewing machine and finished stitching together the Simple Strips quilt top I wrote about in Process & the Frog Pond. One of my goals is to sew at least 3 or 4 days a week and I've been woefully short of that recently.

The simple fact is that quilts don't get finished if I don't sew. That is why one of my annual goals is to sew 3 or 4 days a week. I didn't set a minimum amount of time to sew, because:

  • 5 minutes is better than nothing and
  • sometimes getting started is the hardest part

Simple Strips is a design that Jodie created for our 3rd Sunday Project Linus group. It has 3 versions. We made lots of the first version of the design at our May meeting. This top is the 3rd version. In the 2nd version, you sew the strips together, cut them down the middle, rotate 1 half a half turn and stitch back together.

Jodie does a wonderful job of putting fabrics together and cutting kits for our group. She uses a combination of donated fabric and fabric she buys. She started the kit for this top with the cat print you see in this close-up.

close up of fabrics in Simple Strips quilt top

Time for bed. I plan to post part 2 of the Learning EQ7 series tomorrow.

Quilting on the Internet

I have a few quilting links to share with you.

  • World's Biggest Hexagon Quilt – Australian quilters attempt to get in the Guinness Book of Records with a quilt made of hexagons. The quilt is beyond huge. Quilters around the world contributed to the effort. 152,636 hexagons and 108.8 meters (357 feet) long.
  • Some fun with the EQ7 Clip and Flip feature from Leeann Hansen at Quilt Whangarei.
  • While waiting for EQ7, Judy Butcher of the Virtual Quilter posted her 1,000th virtual quilt design. All 1,000 were designed with Electric Quilt software.

If you're interested in Electric Quilt, you may want to:

It's the best way to keep up to date on all things EQ.

Sunday, June 06, 2010

Weighted Blankets for Autism

Autism Spectrum Disorder affects about 1 in 150 children. Children with Autism have difficulty staying still and quiet. Weighted blankets have a calming effect and enable the children to sleep through the night. They are also used during the day.

The Joplin, Missouri Project Linus coordinator designed a weighted blanket pattern called Lili's Hug. The pattern is on the national Project Linus website. The blanket is 2 layers of cotton fabric stitched into a series of long skinny pockets that are closed with Velcro (hook & loop tape).

The pockets of the blanket are usually filled by folding old sheets or towels very tightly and inserting into each pocket. The Velcro allows the weights to be removed from the pockets for laundering. The blankets weigh about 15 to 18 pounds, depending on the size and the amount of weight added.

In our most recent Kansas City chapter Project Linus newsletter, we were told that there is a waiting list of about 60 children needing these blankets in the Kansas City area. I decided it was time to make my first weighted blanket.

weighted blanket in jungle print

I used a bright jungle print for the front and denim on the back. You can use quilting cotton on the back, but the denim had been donated for a weighted blanket. Autism affects 4 boys to every 1 girl, so I'll not use girly fabric for weighted blankets.

The weights are added to the pockets after the blankets are turned in to our Project Linus coordinator. If you click on the photo to view the larger version, you can see that this blanket has 12 pockets arranged in 2 columns of 6. The Velcro is on the left and right edges. I put some fleece scraps in the pockets in the right column so it wasn't totally flat for the picture.

This photo shows the Velcro (hook & loop tape) on the opening of one of the pockets. Look closely and you'll see that I double-stitched everything thing to make sure it holds up to stuffing and holding all the weight.

weighted blanket pocket opening

The pattern instructions are written to make a blanket from two 1 yard pieces of 45" wide fabric (1 on the front and 1 on the back). It mentions making them larger or smaller.

In the Kansas City area, larger blankets made from 2 pieces of fabric that are 1 1/8 to 1 1/4 yards long. Be sure to check with your local Project Linus chapter or other organization to find out what is needed in your area if you decide to make one of these blankets.

Thursday, June 03, 2010

Knitting Club - June - 1st Thursday

Knitting club met today. Two hours of bliss with fellow stitchers and chatters. A variety of projects were worked on, but show & tell was dominated by hats.

several Indian hats

Audrey makes hundreds of hats for Native American children. Several women from the various groups that she knits with make hats to contribute. Someone brought her a few today. I don't know who, because I arrived late. In the fall, Audrey ships the hats to someone who works for (or used to) the Bureau of Indian Affairs and they distribute the hats to the Indian Reservations.

There is only one knitted cap pattern used for these hats. We call it the Indian hat pattern. With different yarns and different stripe patterns (or no stripes at all), every hat is different. A few more people took a copy of the pattern home today.

weaving yarn endsIndian hat

Kathy wove in lots of yarn ends to finish this pink and green Indian hat.

knitted hat in progress

Audrey was working on a purple and red Indian hat.

Vanilla Twist hat

It's not an Indian hat, but I did the finishing on this Vanilla Twist hat during knitting club and then knit on my socks.

The Vanilla Twist hat is a free pattern from Knitcircus. I made the small size and omitted the cables on the brim for a more masculine hat. The yarn is Red Heart Super Saver in the color dark sage.

As the Vanilla Twist pattern is written, the spiral purl pattern on the body of the hat will not spiral. I added 1 more stitch to make the design spiral properly. Some have used the stitch pattern instructions for working flat.

Wednesday, June 02, 2010

Color Pools

color pooling on socks in progress

I'm making the gusset increase for my toe-up version of Hermione's Everyday Socks. The increased number of stitches per round, quickly caused the Berry Cobbler colors in the yarn to pool.

color pooling on socks in progress

I've made over half the increases and the colors are forming stripes again. I expect more pooling as I finish the gusset increases. Once I have the heels done, it may go back to stripes. I will use 5 more stitches on the leg than I did on the foot which could cause pooling.

Earlier post about these socks: Berry Cobbler, Anyone?

Tuesday, June 01, 2010

Learning EQ7 - Part 1

Find a list of all the articles in this series on the Learning EQ7 Series page. The sidebar also has a link to the series page.


Video 1 - Learn Your Way Around EQ7

Duration: 4 minutes, 10 seconds

There are 3 worktables in EQ7.

  • quilt
  • block
  • images

Video 1 gives a thorough overview of how to switch between the 3 worktables and how to determine which worktable you are on. The images worktable is new in EQ7.

Video 2 - Where to Find Blocks, Fabrics and More

Duration: 2 minutes, 32 seconds

Like EQ6, EQ7 has 6 libraries of design items that you can use to create your quilt designs. The EQ7 libraries contain over 20,000 design elements.

Block Library
pieced and applique blocks and quilting designs.
Fabric Library
thousands of fabrics. You can scan your fabrics to create a custom library.
Layout Library
prebuilt quilt layouts for quilts of various sizes: king, twin, lap, crib, tablerunners and more. Or you can create your own custom layout.
Embroidery Library
images provided by companies that provide digitized embroidery images. The images allow you to see how the embroidery would look on your quilt, but you need to buy the embroidery designs from the company that created them.
Photo Library
photos you can use in your quilt
Thread Library
a variety of thread colors from major thread manufacturers. Use items from this library to color quilting stencils and embroidery designs in your quilt designs.

Video 2 was short and I spent time browsing through the libraries. There are lots of blocks and fabric. The fabric is sorted by category, color or manufacturer. You can choose which way you want to browse.

At this point, I started up EQ6 to see what fabrics it has. It looks very similar. Silly me. I never got beyond using the EQ6 Default Fabrics and there are so many more choices.

I had no idea the layout library existed in EQ6, but it's there. The EQ6 and 7 versions look very similar, but there are more layouts in the EQ7 layout library.

I briefly looked at the photo and thread libraries. I’m not sure I will use these. The EQ7 thread collections are very similar to the ones in EQ6. The images in the photo library seem very different from EQ6 and this is the smallest library.